
How to Take a Screenshot on an HP Laptop Using Keyboard Shortcuts and Built-in Tools
To capture your entire screen and save it automatically, press Windows + PrtSc . For a custom area, use Windows + Shift + S . If you are using an HP tablet or x360 in tablet mode, press the Power and Volume Down buttons simultaneously.
Win + PrtSc
Win + Shift + S
Alt + PrtSc
Capturing your screen is an essential skill for modern computing, whether you are saving a receipt, documenting a software bug, or sharing a funny moment from a video. On an HP laptop, the process is generally straightforward, but hardware variations—such as the presence of a Function (Fn) key or the specific layout of an EliteBook versus a Pavilion—can sometimes cause confusion. This guide explores every reliable method to ensure you can capture exactly what you need, every time.
According to technical guides from Box.co.uk , understanding your specific keyboard layout is the first step toward mastering these shortcuts. Many users find that while the standard Windows shortcuts work, HP-specific hardware quirks require a slightly different approach to achieve the desired result.
Quick Reference for HP Screenshot Keyboard Shortcuts
If you are in a hurry, this table provides a snapshot of the most effective ways to capture your screen on Windows 10 and Windows 11 HP devices. These methods rank among the top choices for efficiency and ease of use.
| Action | Keyboard Shortcut | Result |
|---|---|---|
| Capture Full Screen | PrtSc | Copies entire screen to clipboard. |
| Auto-Save Full Screen | Win + PrtSc | Saves PNG file to Pictures folder. |
| Selectable Snip | Win + Shift + S | Opens Snipping Tool overlay. |
| Current Window Only | Alt + PrtSc | Copies active window to clipboard. |
| Tablet Mode | Power + Vol Down | Saves capture on 2-in-1 devices. |
Using the Print Screen Key on Your HP Laptop Keyboard
The PrtSc (Print Screen) key is the traditional method for capturing your display. On most HP laptops, this key is located in the top row of the keyboard, often near the Delete or Backspace keys. When you press this button alone, Windows captures everything currently visible on your monitor and stores it in your "Clipboard"—a temporary storage area in your computer's memory.
To see your screenshot, you must "paste" it into another application. Common choices include Microsoft Paint, Word, or an email draft. Simply press Ctrl + V to place the image. While this method is widely regarded as a standard, it does not create a permanent file on its own, which is a common point of confusion for new users.
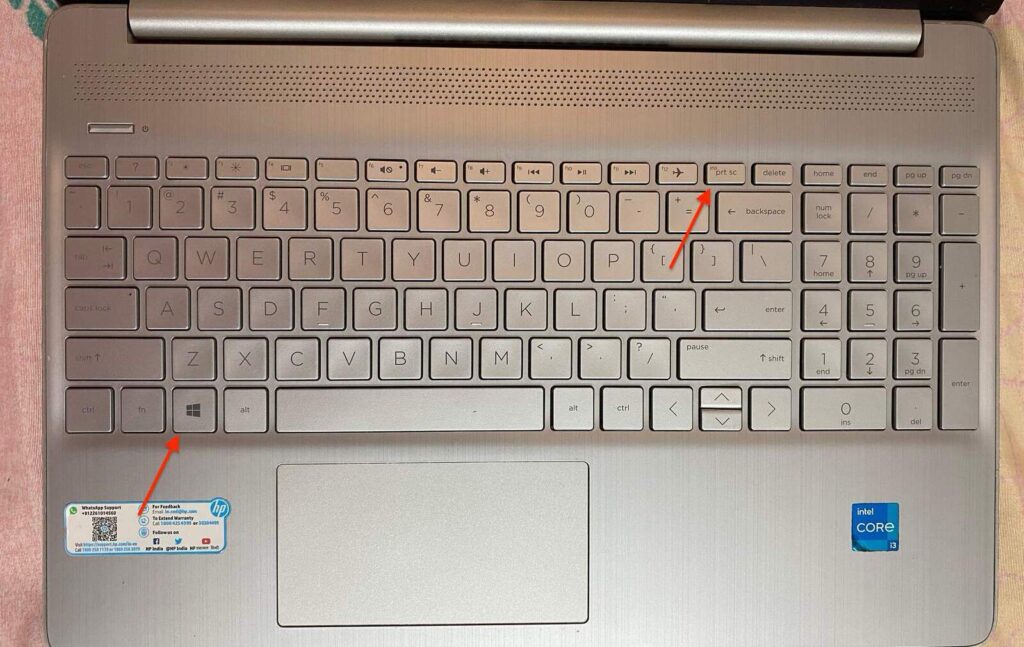
Image source: Fossbytes
Why You Might Need to Press the Fn Key First
A frequent hurdle for HP users is the "Action Key" setting. Many HP laptops, particularly the Pavilion and Envy series, default the top row of keys to media functions like volume control or screen brightness. In these cases, the PrtSc label is often printed in a smaller font or a different color on the same key as a media icon.
If pressing PrtSc by itself does nothing, you likely need to hold the Fn (Function) key while pressing it. This tells the laptop to ignore the media command and execute the secondary command (the screenshot). This dual-layer functionality is a design choice to save space on compact laptop chassis, but it is one of the primary reasons users believe their Print Screen button is broken.
Capturing Only the Active Window with Alt and Print Screen
If you have a messy desktop or are using multiple monitors, you might not want to capture every single pixel. By holding the Alt key while pressing PrtSc , Windows will only capture the window that is currently "active" or in focus. This is a top-tier choice for creating professional documentation or tutorials where you only want to show a specific dialogue box or application window.
Like the standard method, this copies the image to your clipboard. You will still need to paste it into an editor to save it as a file. This method is highly effective for avoiding the need to crop your images later, saving significant time during the editing process.
Automatically Saving Screenshots to Your Pictures Folder
For those who want to skip the "pasting" step entirely, the Windows + PrtSc shortcut is a significant advancement in workflow efficiency. When you press these two keys together, your laptop captures the entire screen and immediately writes it to a file on your hard drive.
This method is particularly useful when you need to take multiple screenshots in rapid succession. Instead of stopping to save each one manually, you can keep working while Windows handles the file creation in the background. The files are typically saved in the PNG format, which maintains high image quality without the compression artifacts often seen in JPEGs.
If you have OneDrive enabled on your HP laptop, you may see a notification asking if you want to save screenshots to the cloud. If you agree, your screenshots will be accessible from any device logged into your Microsoft account, which is a popular choice for users who work across multiple computers.
Verifying Your Screen Captured Successfully
When you use the Windows + PrtSc combination, you should notice a brief "dimming" or flickering of the screen. This visual cue is the system's way of confirming that the capture was successful. If your screen does not dim, the screenshot may not have been saved.
If you find that the dimming effect is missing, it may be due to your Windows performance settings. You can check this by searching for "Adjust the appearance and performance of Windows" in the Start menu and ensuring that "Animate windows when minimizing and maximizing" is checked. Even if the animation is off, the file is usually still created, but the visual confirmation provides peace of mind.
Using the Windows Snipping Tool for Custom Captures
The Snipping Tool (often referred to as "Snip & Sketch" in older versions of Windows 10) is widely considered one of the best built-in utilities for precise captures. By pressing Windows + Shift + S , you trigger an overlay that allows you to draw a box around exactly what you want to capture.
This tool offers four distinct modes:
- Rectangular Snip: Draw a box around any part of the screen.
- Freeform Snip: Draw any shape with your mouse or stylus.
- Window Snip: Click a specific window to capture it perfectly.
- Full-screen Snip: Capture the entire display.
As noted in community discussions on Reddit , the Snipping Tool is the preferred method for users who need to annotate their images immediately after capture, as it opens a small editor window where you can draw, highlight, or crop the image.
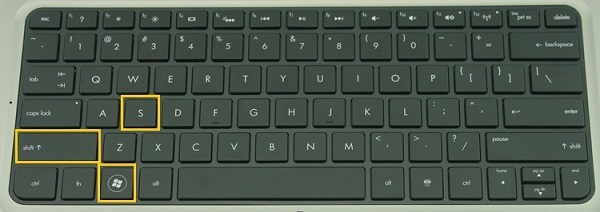
Image source: FonePaw
Choosing Between Rectangular and Freeform Snips
The Rectangular snip is the most common choice, providing clean, straight edges for your captures. However, the Freeform snip is notably innovative for creative tasks. If you are using an HP Spectre or Envy with a touch screen and a stylus, the Freeform tool allows you to "cut out" specific objects or text in a way that feels natural and fluid.
Once you finish drawing your shape, the capture is copied to your clipboard, and a notification appears in the bottom-right corner of your screen. Clicking this notification opens the full Snipping Tool interface, where you can save the file to a location of your choice or share it directly via email or social media.
Using the Delay Feature for Menus and Tooltips
One of the most powerful features of the Snipping Tool is the "Delay" function. Have you ever tried to take a screenshot of a right-click menu, only for the menu to disappear the moment you press your keyboard shortcuts? The Delay feature solves this.
By opening the Snipping Tool app manually (search for it in the Start menu), you can set a timer for 3, 5, or 10 seconds. Once you click "New," you have that amount of time to open the menu or hover over the element you want to capture. When the timer runs out, the screen freezes, allowing you to snip the "disappearing" element with ease. This is a top-tier tip for technical writers and IT support staff.
Taking a Screenshot on HP Tablets and 2-in-1 Laptops
HP is a leader in the 2-in-1 market with its Spectre x360 and Envy x360 lines. When these devices are folded into tablet mode, the keyboard is usually disabled to prevent accidental presses. In this state, traditional keyboard shortcuts are unavailable, requiring a hardware-based approach similar to a smartphone.
To take a screenshot in tablet mode, you must use the physical buttons on the side or edge of the device. This method is consistent across most modern Windows tablets and provides a reliable way to capture content when you are on the go or using the device as a digital sketchbook.
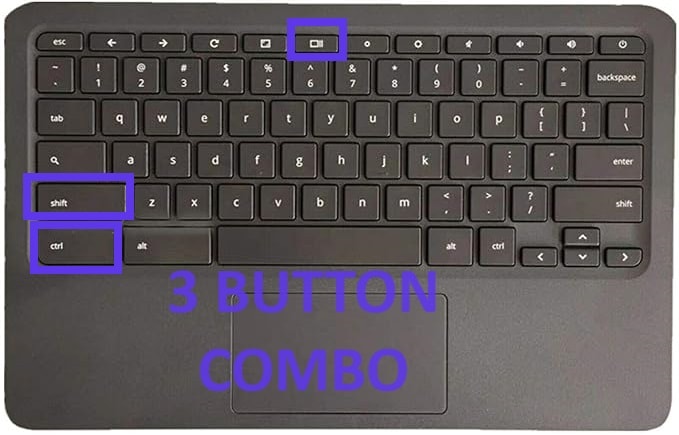
Image source: Wondershare UniConverter
The Two Second Hold Rule for Physical Buttons
The standard combination for HP tablets is the Power button + Volume Down button. However, timing is critical. You must press them simultaneously and hold them for approximately two seconds. A quick "tap" might simply lock the screen or change the volume without triggering the capture.
When successful, the screen will dim briefly, and the image will be saved to your Pictures > Screenshots folder. If you are using an older HP tablet with a physical Windows button on the bezel (the frame around the screen), the combination is often the Windows Button + Volume Down .
Taking a Screenshot on an HP Chromebook
While most HP laptops run Windows, the company also produces a significant number of Chromebooks. These devices use ChromeOS, which has an entirely different keyboard layout and set of shortcuts. If you are looking for the PrtSc key on a Chromebook, you won't find it.
Instead, Chromebooks use a dedicated "Show Windows" key, which looks like a rectangle with two vertical lines next to it. This key is typically located in the top row, where the F5 key would be on a Windows machine. Mastering these shortcuts is essential for students and professionals who rely on HP's ChromeOS hardware.
Using the Keyboard Shortcut for Full and Partial Screens
To capture the entire screen on an HP Chromebook, press Ctrl + Show Windows . The screenshot will appear in a small preview window in the bottom-right corner, and the file will be saved automatically to your "Downloads" folder.
For a partial screenshot, press Ctrl + Shift + Show Windows . Your cursor will turn into a crosshair, allowing you to click and drag a box around the area you wish to capture. This is a highly effective way to grab specific snippets of information from a webpage or document without capturing the entire browser interface.
Using the Quick Settings Menu in ChromeOS
If you prefer a mouse-driven approach, ChromeOS includes a "Screen Capture" tool in the Quick Settings menu. Click on the time in the bottom-right corner of your shelf to open the menu, then select the "Screen Capture" icon. This opens a toolbar at the bottom of the screen that allows you to toggle between screenshots and screen recordings, as well as choose between full, partial, or window captures.
This tool is widely regarded as one of the most user-friendly capture interfaces in any operating system, as it provides clear visual icons for every function. It also allows you to change the save location from the default Downloads folder to a specific folder in your Google Drive.
Finding Where Your Screenshots Are Saved on an HP Laptop
One of the most common frustrations for users is taking a screenshot and then being unable to find the file. Depending on the method you used, your screenshot could be in one of several different locations. Understanding this file logic is key to staying organized.
As Awesome Screenshot's blog points out, Windows distinguishes between "Captures" (gaming) and "Screenshots" (standard), which often leads to users looking in the wrong directory.
Locating Standard Captures in the Screenshots Folder
If you used the Windows + PrtSc shortcut, your files are located in a specific subfolder. To find them:
- Open File Explorer (the folder icon on your taskbar).
- Click on Pictures in the left-hand sidebar.
- Open the folder named Screenshots .
Windows automatically numbers these files (e.g., Screenshot (1), Screenshot (2)), so they will always appear in the order they were taken. If you move or delete these files, Windows will continue the numbering from the last highest number it recorded.
Finding Gaming Captures in the Videos Folder
If you are a gamer using an HP Omen or Victus, you might use the Xbox Game Bar shortcut ( Windows + Alt + PrtSc ) to capture your high scores. Curiously, Windows does not save these in the Pictures folder. Instead, they are treated as "Captures" and saved in This PC > Videos > Captures .
This distinction is important because the Game Bar is designed to handle both video recordings and still images. If you are looking for a screenshot you took during a game and it isn't in your Pictures folder, check the Videos directory. This is a common pitfall that few standard guides address clearly.
Troubleshooting a Print Screen Button That Is Not Working
If you have tried the shortcuts above and nothing is happening, you are likely facing a hardware or software conflict. HP laptops have a few specific settings that can "hijack" the Print Screen key, making it feel like the button is broken when it is actually just waiting for a different command.
According to personal workflow insights on Medium , many users find that third-party software like OneDrive or Dropbox can also change how the PrtSc key behaves, often intercepting the press to offer their own cloud-saving features.
Toggling the Function Lock Hack
As mentioned earlier, the Fn key is often the culprit. However, you don't have to hold Fn every single time if you use the "Fn Lock." On many HP keyboards, pressing Fn + Shift (or sometimes Fn + Esc ) will toggle the lock. When the lock is on, the top row keys will act as standard function keys (F1-F12 and PrtSc) without needing the Fn modifier.
If your keyboard doesn't have a shortcut for this, you can change the behavior in the BIOS. Restart your HP laptop and repeatedly press F10 to enter the BIOS Setup. Look for a setting called "Action Keys Mode" or "Function Key Mode" and set it to "Disabled." This will make PrtSc work with a single press, which is a popular choice for power users who take dozens of screenshots daily.
What to Do if Your HP Laptop Lacks a Print Screen Key
Some ultra-compact HP models, like certain versions of the Spectre Folio, have removed the dedicated PrtSc key to save space. If your keyboard is missing this button, you aren't out of luck. You can use the "Screen Snip" button located in the Windows Action Center (the notification icon in the bottom-right corner of your taskbar).
Alternatively, you can remap a different key to act as Print Screen using the HP Accessory Center app or the Microsoft PowerToys utility. This allows you to designate a rarely used key, like the right-hand Ctrl or Alt , to function as your screenshot trigger. This level of customization ensures that even the most minimalist hardware remains fully functional.
Advanced Screenshot Tips for HP Power Users
Beyond the basics, there are several advanced techniques that can make your captures look more professional and provide more information. These methods often involve using built-in browser tools or specific file formats to ensure maximum clarity.
"The difference between a good screenshot and a great one is often the format and the framing. For text-heavy captures, always prioritize lossless formats to avoid the 'fuzziness' of compressed images."
Taking a Scrolling Screenshot in Microsoft Edge
Standard screenshots only capture what is currently visible on the screen. If you need to capture a long article or a full webpage, you would normally have to take multiple shots and stitch them together. However, if you use the Microsoft Edge browser (which comes pre-installed on all HP laptops), there is a native solution.
Press Ctrl + Shift + S while in Edge to open the "Web Capture" tool. You can then select "Capture full page." Edge will automatically scroll down the entire site and create a single, long image file. This is a significant step forward for researchers and students who need to archive entire web pages for offline viewing.
Capturing High Quality PNGs for Better Text Clarity
When you use the Windows + PrtSc method, Windows defaults to the PNG format. This is a top-tier choice because PNG is a "lossless" format, meaning it doesn't lose detail when saved. This is especially important for screenshots containing small text or fine lines, which can become blurry or "pixelated" if saved as a JPEG.
If you are using the Snipping Tool, you have the option to choose your file format when saving. Always opt for PNG unless you have a specific reason to use JPEG (such as a strict file size limit). For the highest possible clarity, ensure your screen resolution is set to its native maximum in the Windows Display settings before taking the capture.
Before sharing a screenshot, always check for sensitive information. Use the Snipping Tool's pen or highlighter to blur out passwords, personal email addresses, or financial data. It is a highly impactful habit that protects your privacy in a digital world.
Frequently Asked Questions
How do I take a screenshot on HP without a Print Screen button?
If your HP laptop lacks a dedicated PrtSc key, the most effective alternative is the shortcut Windows + Shift + S . This opens the Snipping Tool overlay, allowing you to capture any part of the screen. You can also find the "Screen Snip" button in the Windows Action Center (notifications area) or use the "Fn + Spacebar" combination on some compact HP models.
Why are my screenshots coming out black?
Screenshots often appear black when you try to capture copyrighted content from streaming services like Netflix, Disney+, or Amazon Prime Video. These apps use Digital Rights Management (DRM) to prevent unauthorized recording. To resolve this, you may need to disable "Hardware Acceleration" in your browser settings, though this is not always recommended as it can decrease video playback performance.
How do I change where my HP screenshots are saved?
By default, screenshots are saved to Pictures > Screenshots . To change this, right-click the Screenshots folder, select Properties , and go to the Location tab. Click Move and select a new folder. From then on, all screenshots taken with the Win + PrtSc shortcut will automatically go to your new designated location.
Does HP have its own built-in screenshot software?
While HP laptops primarily rely on Windows tools like the Snipping Tool, newer models often come with HP Palette or HP QuickDrop . These apps include features for capturing and quickly sharing images between your laptop and your smartphone. However, for most users, the native Windows shortcuts remain the most reliable and fastest way to capture the screen.
What is the difference between PrtSc and Alt + PrtSc?
The PrtSc key captures your entire desktop, including the taskbar and all open windows across all connected monitors. Alt + PrtSc captures only the window you are currently interacting with. This is a top choice for professional use, as it creates a cleaner image without unnecessary background clutter.
Key Takeaways for HP Screenshots
- Check for the Fn key: If your shortcuts aren't working, you likely need to hold Fn + PrtSc due to HP's media key defaults.
- Use the Snipping Tool for precision: Win + Shift + S is the most flexible method for capturing specific areas.
- Auto-save with Windows key: Use Win + PrtSc to save a file instantly to your Pictures folder without needing to paste.
- Tablet mode requires buttons: On x360 models, use Power + Volume Down for a 2-second hold.
- Chromebooks are different: Use Ctrl + Show Windows for HP's ChromeOS devices.
- Verify your save location: Standard shots go to Pictures , while gaming shots often end up in Videos > Captures .
Try pressing Windows + Shift + S right now to practice selecting a custom area of this page for your records.
-
Topic: How to Screenshot on HP Laptop: Complete Guide (5 Easy ...https://www.hp.com/us-en/shop/tech-takes/how-to-screenshot-on-hp-laptop-or-desktop-computers
-
Topic: How To Take A Screenshot On Your HP Laptop Or Desktophttps://www.youtube.com/shorts/4cyhv8Qu0-I
-
Topic: How to Take a Screenshot on an HP Laptophttps://box.co.uk/blog/how-to-screenshot-on-hp-laptop

How to Take a Photo on a Windows, Mac, or Chromebook Laptop
Learn how to take photos on Windows, Mac, and Chromebook. Fix black screens, find saved files, and improve webcam quality with expert tips.


How to Maximize Any Window Using Windows Keyboard Shortcuts
Learn every Windows shortcut to maximize windows, handle Windows 11 snap layouts, and fix stuck apps using keyboard commands and PowerToys.
How to Find and Manage Your Clipboard History on Any Android Device
Access, pin, and manage Android clipboard history on Samsung, Pixel, and OnePlus. Recover lost clips and clear data safely.