
How to Take a Photo on a Windows, Mac, or Chromebook Laptop
- Windows: Press the Windows Key , type "Camera," and press Enter.
- Mac: Press Cmd + Space , type "Photo Booth," and press Enter.
- Chromebook: Click the Launcher (circle icon), type "Camera," and select the app.
These native applications are standard across modern operating systems as of 2026.
In an era where remote work and digital communication are standard, knowing how to quickly capture an image using your laptop is a fundamental skill. Whether you need a quick selfie for a profile picture, a photo of a physical document, or a capture of your screen for troubleshooting, the process varies significantly depending on your hardware and software.
This guide provides a thorough walkthrough for Windows, macOS, and ChromeOS users. We will also address the common confusion between taking a "photo" (using your webcam) and taking a "screenshot" (capturing what is on your display), ensuring you have the right tool for every situation.
How to Take a Photo on a Windows 10 or 11 Laptop
Windows laptops, ranging from Microsoft Surface devices to hardware from Dell, HP, and Lenovo, utilize a built-in application simply called "Camera." This app is the primary interface for both still photography and video recording.
Finding and Opening the Camera App
To begin, click the Start button or press the Windows key on your keyboard. In the search bar, type "Camera." The application should appear as the top result. Click to launch it. If this is your first time using the app, Windows may ask for permission to access your camera and microphone; you must select "Yes" or "Allow" for the hardware to function.
If the app fails to open or shows an error message, you may need to check your privacy settings. Navigate to Settings > Privacy & Security > Camera and ensure that "Camera access" and "Let apps access your camera" are both toggled to the On position. This is a common security feature that prevents unauthorized software from using your webcam without your knowledge.
Capturing Your First Image
Once the app is open, you will see a preview of what your webcam sees. On the right side of the window, you will find two primary icons: a camera icon for still photos and a video camera icon for recording. Ensure the still camera icon is highlighted.
To take the photo, you can either click the large white camera button on the screen or press the Enter key. For those who want to avoid the "reaching for the mouse" look in their photos, the Camera app includes a built-in timer. Look for the clock icon on the left or top of the interface. You can set a delay of 2, 5, or 10 seconds, giving you ample time to pose and look directly at the lens.
Image source: YouTube
How to Take a Photo on a Mac Using Photo Booth
While many Mac users naturally gravitate toward FaceTime, that application is strictly for video calls. For capturing and saving still images, Apple provides a dedicated application called Photo Booth .
Why You Should Use Photo Booth Instead of FaceTime
Photo Booth is designed specifically for photography. It allows you to apply filters, take bursts of photos, and manage a local gallery of images. FaceTime, by contrast, does not have a native "shutter" button for still photos during a call without using the "Live Photo" feature, which requires both parties to have the setting enabled. For a simple selfie or document capture, Photo Booth stands out as a top choice.
Step-by-Step Mac Capture Process
1 Open Spotlight by pressing Cmd + Space , type "Photo Booth," and press Enter. Alternatively, you can find it in your Applications folder via Finder.
2 In the bottom-left corner of the Photo Booth window, you will see three icons. The first captures a single still image, the second takes a sequence of four photos (similar to a traditional physical photo booth), and the third records video. Select the single-photo icon.
3 Click the red camera button in the center of the bottom bar. A three-second countdown will begin, accompanied by a screen flash to indicate the photo has been taken. Your new photo will appear in the "tray" at the bottom of the window for easy access.
How to Take a Photo on a Chromebook
Chromebooks have gained significant popularity in educational and professional settings, yet many users are unaware of the robust features within the ChromeOS Camera app. This is often referred to as the "Chromebook Gap" in tech tutorials, as many guides focus solely on Windows and Mac.
Using the ChromeOS Camera App
To access the camera on a Chromebook, click the Launcher (the circular icon in the bottom-left corner of your shelf). Type "Camera" and select the app icon. The ChromeOS Camera app is notably innovative, offering features often found on smartphones, such as a "Portrait" mode that uses software to blur the background and a "Square" mode ideal for social media profile pictures.
When you take a photo on a Chromebook, the file is saved to your Downloads folder by default, or it may be synced directly to your Google Photos account if you have that integration enabled. This makes Chromebooks an excellent choice for users who rely heavily on cloud storage for their media management.
Are You Trying to Take a Screenshot Instead?
Research suggests that a significant number of users who search for "how to take a photo from laptop" are actually looking to capture their screen rather than their face. This "intent gap" often leads to frustration when users find themselves in the webcam app instead of capturing their desktop.
| Operating System | Shortcut for Full Screen | Shortcut for Selected Area |
|---|---|---|
| Windows 10/11 | Print Screen (PrtSc) | Win + Shift + S |
| macOS | Cmd + Shift + 3 | Cmd + Shift + 4 |
| ChromeOS | Ctrl + Overview Key | Ctrl + Shift + Overview Key |
For gamers, these shortcuts may differ. If you are using Steam, the default key to "take a pic" of your gameplay is F12 . Windows users can also use the Windows Game Bar (Win + G) to capture high-quality screenshots and video clips without exiting their game. According to community discussions on platforms like Facebook Photography Groups, understanding these shortcuts is the fastest way to document digital work or achievements.
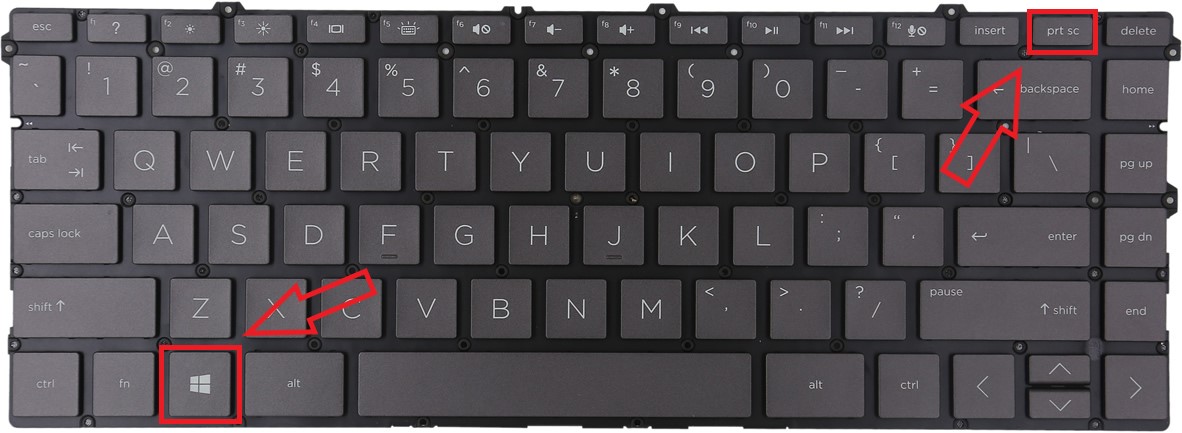
Image source: MyFixGuide
Why Is My Laptop Camera Showing a Black Screen?
It is a common experience: you open the Camera app, but all you see is a black rectangle. Before assuming your hardware is broken, check these three common culprits that account for the majority of "broken" laptop cameras.
Check for a Physical Privacy Shutter
Many modern laptops from manufacturers like Lenovo, HP, and Dell now include a physical privacy shutter . This is a tiny sliding plastic tab located directly above or next to the camera lens. If you see a small red or orange dot where the lens should be, the shutter is closed. Simply slide it to the side to reveal the lens. This hardware feature is designed to provide peace of mind, but it is frequently the cause of "black screen" support tickets.
The Function Key (F-Key) Hardware Toggle
Some laptops, particularly those designed by MSI, ASUS, and Lenovo, have a dedicated Function key that acts as a "kill switch" for the camera. This operates at the hardware level, meaning no amount of software troubleshooting will fix it until the key is pressed. Look for a camera icon on your F-keys (usually F6, F8, or F10). You may need to hold the Fn key while pressing it to re-enable the camera.
Where Are My Laptop Photos Saved?
Finding your photos after you take them can be surprisingly difficult due to modern cloud syncing services like OneDrive and iCloud, which sometimes move files away from their local folders.
Finding Files on Windows
By default, the Windows Camera app saves every photo to a specific folder:
This PC > Pictures > Camera Roll
. If you cannot find your photos here, check your OneDrive settings. Windows may be automatically uploading these images to the cloud and removing the local copy to save space. You can verify this by looking for a blue cloud icon next to your Pictures folder in File Explorer.
Finding Files on macOS
On a Mac, photos taken in Photo Booth are stored within the app's internal library. To use them elsewhere, you can simply click and drag the thumbnail from the bottom tray of Photo Booth directly onto your desktop or into a folder. Alternatively, you can find them in the Photos app , as macOS often integrates these libraries for a seamless experience across devices.
How to Make Your Laptop Photos Look Professional
Most laptop webcams are limited to 720p resolution (roughly 1 megapixel), which is significantly lower than the quality of a modern smartphone. However, you can still achieve high-quality results by following a few professional photography principles.
The "Window Light" Rule for Better Exposure
Lighting is the most critical factor in webcam quality. Because laptop sensors are small, they struggle in low-light environments. Always face a window or a bright lamp. This "front-lighting" ensures your face is evenly illuminated. Never sit with a window behind you; this creates a "silhouetting" effect where your face appears as a dark shadow against a blown-out white background. This happens because cameras are tuned to render scenes at 18% gray , and the bright light from behind confuses the sensor's exposure calculation.
The Eye Contact Hack
When taking a selfie or recording a video, our natural instinct is to look at our own face on the screen. However, this makes it look like you are looking down or away in the final photo. To create a sense of engagement, you must look directly at the lens —the small glass dot at the top of your screen. This simple adjustment significantly improves the professional feel of your photos.
Applying the Rule of Thirds
Avoid the "floating head" look by positioning your laptop so that your eyes are roughly one-third of the way down from the top of the frame. This follows the Rule of Thirds , a fundamental principle of composition that makes images more aesthetically pleasing. If your laptop is sitting on a desk, you may need to prop it up on a stack of books to bring the camera to eye level, which also provides a more flattering angle than looking "down" into the lens.
Advanced Tools for Power Users
For those who need more than what native apps offer, several third-party tools provide enhanced functionality. Parallels Toolbox , for instance, offers an "Instant Photo" tool. This allows you to snap a photo with a single click from your taskbar or menu bar without ever opening a preview window—perfect for rapid documentation of receipts or ID cards.
Another interesting use case is security. Some users employ software like "Mouse Lock," which can be configured to automatically take a photo using the webcam if someone enters an incorrect password. This provides a visual record of unauthorized access attempts, turning your simple webcam into a basic security device.
Frequently Asked Questions
Most laptops prioritize thin screen bezels over camera hardware. This means the sensors are tiny—often only 1 megapixel (720p). Smartphones have much more physical space for larger sensors and multiple lenses, allowing for 12MP or higher resolution. To compensate, ensure you have excellent lighting, as small sensors perform poorly in dim rooms.
Yes. Most external USB webcams are "plug-and-play." Once you plug the camera into a USB port, your operating system will recognize it. In the Windows Camera app or Mac Photo Booth, there is usually a "switch camera" icon (a camera with circular arrows) that allows you to toggle between the built-in lens and your external one.
If your device lacks a camera, your best option is to use your smartphone. Take the photo on your phone and use a cloud service like Google Photos, iCloud, or Dropbox to sync the image to your laptop. Alternatively, you can purchase an affordable external USB webcam which will work with all the software mentioned in this guide.
On almost all modern laptops, that light is hardwired to the camera's power supply. This is a safety feature to ensure you know whenever the camera is active. It cannot be turned off via software. If the light is on and you aren't intentionally using the camera, close all apps or check your background processes for unauthorized camera usage.
Some apps, like Photo Booth on Mac, will briefly turn the entire screen white at maximum brightness to act as a "flash" when you take a photo. On Windows, you can achieve a similar effect by opening a blank white Notepad window or a white browser tab and maximizing it before snapping your photo. However, natural light remains a superior option for clarity.
Key Takeaways for Taking Laptop Photos
- Use native apps: Stick to "Camera" on Windows and "Photo Booth" on Mac for the most reliable experience.
- Check for shutters: Always verify that your physical privacy slider is open if you see a black screen.
-
Master shortcuts:
Use
Win+Shift+SorCmd+Shift+4if your goal is to capture the screen rather than your face. - Prioritize lighting: Face a window to provide the small webcam sensor with enough light to produce a clear image.
- Look at the lens: Maintain "eye contact" with the small camera dot, not your own reflection on the screen.
- Know your save path: Check the "Camera Roll" folder on Windows or drag-and-drop from Photo Booth on Mac.
- Propping is key: Raise your laptop to eye level using books to achieve a more professional and flattering angle.
For your next photo, try placing your laptop on a stack of books near a window to see an immediate improvement in your image quality.

How to Take a Screenshot on an HP Laptop Using Keyboard Shortcuts and Built-in Tools
Learn how to take a screenshot on HP laptops using shortcuts, Snipping Tool, and physical buttons. Fix PrtSc issues and find saved files fast.


Where to Find High-Quality Inspirational Wallpapers for Your Phone and Desktop
Download free 4K inspirational wallpapers for iPhone, PC, and Android. Find minimalist, gym, and study backgrounds to boost your daily productivity.
How to Blur Your Background in Zoom on Any Device
Learn how to blur your Zoom background on Windows, Mac, and mobile. Fix missing blur options and optimize your video for professional meetings.