
How to Blur Your Background in Zoom on Any Device
To blur your background in Zoom, navigate to Settings > Background & Effects and select the Blur tile. If you are already in a meeting, click the up-caret (^) next to the "Stop Video" icon and choose Blur My Background . This feature is available for both Free and Pro accounts on Windows, macOS, iOS, and Android.
In the modern era of remote work, maintaining a professional appearance during video calls is essential. Whether you are working from a busy coffee shop or a home office that hasn't been tidied, the Zoom blur feature provides an instant solution. This software-based AI filter intelligently distinguishes your silhouette from your surroundings, obscuring everything behind you with a soft-focus effect. According to official Zoom documentation , this feature is widely accessible to all users, regardless of their subscription plan, provided their hardware meets the necessary processing requirements.
How to Blur Your Background Before a Meeting Starts
Setting up your blur effect before joining a call is a top-tier strategy for ensuring you look professional from the very first second. This prevents other participants from seeing your environment during the brief moment between joining and activating your filters.
Accessing Settings Through the Zoom Desktop Client
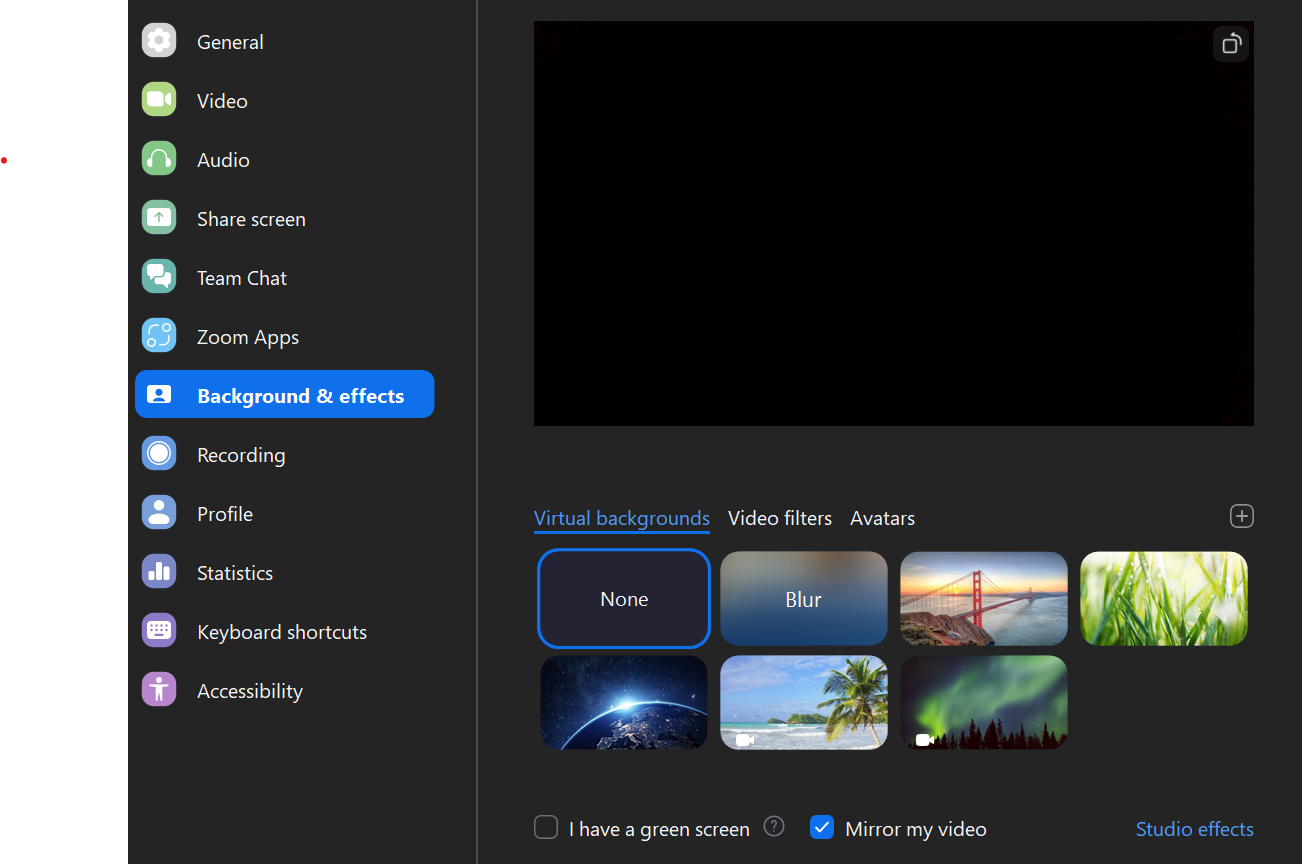
Image source: Tactiq
Previewing Your Video to Check the Blur Quality
While in the settings menu, take a moment to look at the preview window. Zoom's AI segmentation works by identifying high-contrast edges. If you notice your hair or ears are being "eaten" by the blur, it may be due to low lighting or a background that is too similar in color to your skin tone. Many users find that toggling the "Mirror my video" setting helps them feel more natural on camera, though it does not affect how others see the blur.
How to Blur Your Background During a Live Zoom Meeting
If you have already joined a call and realized your background is distracting, you can activate the blur effect without leaving the meeting. This is a highly impactful feature for those unexpected moments when someone walks into the frame or you need to move to a different room.
Using the Video Menu Shortcut
The fastest way to toggle your background is through the video controls at the bottom of the meeting window. Follow these steps:
- Locate the Stop Video icon in the bottom-left corner of your screen.
- Click the small up-caret (^) symbol immediately to the right of the icon.
- Select Blur My Background from the pop-up menu.
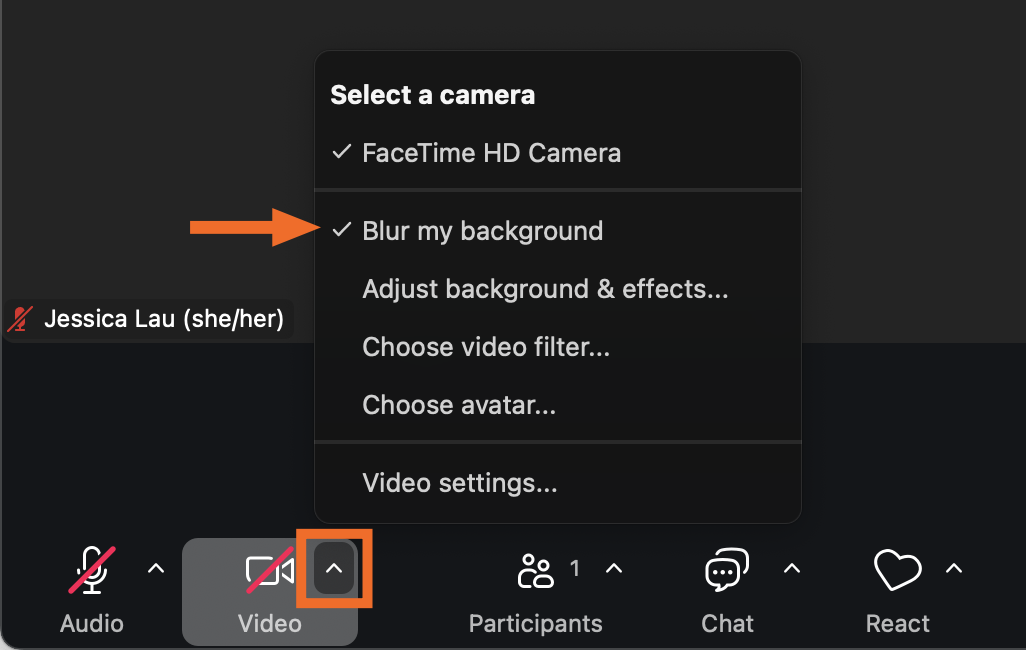
Image source: Zapier
Changing Background Effects Without Leaving the Call
If you want more granular control, such as switching from a blur to a virtual image, you can access the full settings menu from within the call. Click the up-caret (^) next to "Stop Video" and select Choose Virtual Background . This opens the full settings window, allowing you to test different effects while your colleagues only see the final result once you apply it. This method is widely regarded as a professional way to manage your appearance mid-call.
How to Blur Your Background on iPhone and Android Devices
The Zoom mobile app has seen significant advancements in recent years, bringing desktop-class AI features to smartphones. Whether you are using an iPhone or an Android device, the process is remarkably similar.
Navigating the Mobile Interface
To blur your background on mobile, you must be in a meeting or in the "New Meeting" preview screen:
- Tap the screen to reveal the meeting controls.
- Tap the More (...) button in the bottom-right corner.
- Select Backgrounds & Effects (on some versions, this may just say "Virtual Background").
- Tap the Blur option.
Minimum Mobile Requirements for Background Effects
Not every smartphone can handle real-time AI segmentation. According to UC Today , your device must meet specific version requirements to see the blur option:
| Platform | Minimum App Version | Hardware Note |
|---|---|---|
| iOS | 5.6.6 or higher | iPhone 8 or newer recommended |
| Android | 5.6.6 or higher | Requires high-performance processor (Snapdragon 835+) |
Why Is the Blur Option Missing in My Zoom Settings?
One of the most common frustrations for users is the complete absence of the "Blur" button. If you have followed the steps above and cannot find the option, it is likely due to one of three factors: hardware limitations, outdated software, or administrative restrictions.
Checking Your Computer CPU and Hardware Compatibility
Zoom's blur feature relies on the AVX2 (Advanced Vector Extensions 2) instruction set. This is a technical requirement for the AI to process video frames fast enough for real-time display. If your processor is more than 7-8 years old (such as older Intel Core i3 or Celeron chips), the "Blur" tile will simply not appear in your menu. Unlike virtual images, which can sometimes work with a physical green screen on older hardware, the blur effect is strictly software-dependent and requires modern CPU architecture.
Verifying Your Zoom App Version and Updates
If your hardware is modern but the option is still missing, you may be running an outdated version of the client. Zoom introduced the blur feature in version 5.5.0. To check your version:
- Click your Profile Picture .
- Select Help > About Zoom .
- If you are below version 5.5.0, select Check for Updates and install the latest release.
Resolving Admin Restrictions in Corporate Accounts
In corporate or educational environments, IT administrators have the power to disable virtual backgrounds at the account level. If the entire "Background & Effects" tab is missing, this is likely a policy restriction. You will need to contact your IT department to ask them to enable "Virtual Backgrounds" in the Zoom Web Portal settings. Many organizations disable this to save bandwidth or maintain a specific corporate aesthetic, but it is often one of the top requests from remote employees.
How to Fix Zoom Blur Issues on Mac and Windows 11
Even on supported hardware, software glitches can cause the blur feature to disappear or crash. In recent months, specific issues have emerged following major OS updates.
Rebuilding the Zoom Library Folder on macOS
On macOS, the Zoom app stores its background assets in a hidden library folder. If these files become corrupted during an update, the blur option may vanish. A highly effective fix involves forcing Zoom to rebuild this folder:
- Quit Zoom completely.
-
Open
Finder
and press
Cmd + Shift + G. -
Paste the following path:
~/Library/Application Support/ -
Locate the
zoom.usfolder and move it to the Trash. - Restart Zoom and sign back in. The app will re-download the necessary AI modules.
Handling the Windows 11 24H2 Update Conflict on ARM Devices
Users on ARM-based Windows devices, such as the Surface Pro X, have reported conflicts with the Windows 11 24H2 update that break Zoom's native blur. If you are affected by this, a strong contender for a workaround is using Windows Studio Effects . This is a built-in OS feature that applies a blur at the system level before the video reaches Zoom. You can find this in the Windows 11 Quick Settings (Win + A) under "Studio Effects."
What to Do If Your Computer Does Not Support Zoom Blur
If your CPU is officially unsupported, you don't necessarily have to buy a new computer. There are notably innovative workarounds that allow you to achieve a similar effect using third-party software.
Using OBS Studio as a Virtual Camera Bridge
OBS Studio is a free, open-source broadcasting tool that can process your video before sending it to Zoom. This method offloads the processing to different algorithms that may work on older hardware:
- Download and install OBS Studio .
- Add your webcam as a "Video Capture Device" source.
- Right-click the source, select Filters , and add a "Blur" filter (you may need a plugin like StreamFX for high-quality blur).
- Click Start Virtual Camera in the OBS control panel.
- In Zoom, select OBS Virtual Camera as your camera source.
Why You Should Avoid Discontinued Tools Like Snap Camera
Many older tutorials recommend using Snap Camera to achieve background effects. However, Snap Camera for desktop was officially discontinued in early 2023. While some "patched" versions exist online, they are not officially supported and may pose security risks. For a reliable, long-term solution, OBS Studio or native OS effects are preferred over defunct third-party apps.
How to Get a Cleaner Blur Effect with Better Lighting
The quality of your blur isn't just about your CPU; it's about the data the AI is receiving. If the image is grainy or dark, the software will struggle to find the "edge" of your body.
Improving AI Edge Detection with Front-Facing Light
The most significant step forward in video quality is proper lighting. Ensure your primary light source is in front of you, not behind you. If you have a bright window behind you, the AI will see you as a dark silhouette, making it nearly impossible to distinguish your hair from the background. This leads to the "glitchy" look where parts of your head disappear into the blur. A simple desk lamp placed behind your monitor can significantly improve the AI's accuracy.
Solving the Headphone Glitch
Large over-ear headphones often confuse Zoom's background segmentation. The AI sometimes identifies the headphones as part of the background and blurs them out, or vice versa. If you find this happening frequently, switching to smaller earbuds or improving the contrast between your headphones and the wall behind you can help. Interestingly, the "Blur" setting is generally more forgiving for headphone users than image-based virtual backgrounds, as the transition between the subject and the blur is less jarring than a sharp cut-out against a fake beach.

Image source: Zoom Support
Frequently Asked Questions
The experience on Chromebooks is often limited. While the Zoom PWA (Progressive Web App) supports some background effects, it has much higher hardware requirements than the Windows or Mac versions. Many budget Chromebooks lack the processing power to run the blur effect smoothly, and the option may be hidden or disabled by default.
Yes, the blur feature is available to all users, including those on the Basic (Free) plan. It is not a premium or "Pro" feature. As long as your device meets the technical hardware requirements, you can use the blur effect without any additional cost.
Glitchy backgrounds are usually caused by low light, a busy background with many moving parts (like a fan), or wearing clothes that match the color of your wall. To fix this, try to sit in front of a plain, solid-colored wall and ensure you have plenty of light on your face.
Currently, the native Zoom app provides a binary on/off toggle for the blur effect. You cannot adjust the "strength" or "depth" of the blur within the standard settings. If you require a lighter or heavier blur, you would need to use a third-party virtual camera bridge like OBS Studio.
Yes, blurring your background requires constant AI processing of every video frame. This increases CPU usage, which in turn consumes more battery power. If you are on a laptop and running low on power, turning off the blur can help extend your remaining battery life.
Key Takeaways for Mastering Zoom Blur
Maintaining a professional presence in virtual meetings is simpler when you understand the tools at your disposal. Here is a summary of how to ensure your blur effect works perfectly every time:
- Check your hardware: Ensure your CPU supports the AVX2 instruction set; otherwise, the blur option will not appear.
- Update regularly: Always run at least version 5.5.0 of the Zoom client to access modern background effects.
- Use shortcuts: Toggle the blur mid-meeting using the up-caret (^) next to the "Stop Video" icon for quick privacy.
- Optimize lighting: Position a light source in front of you to help the AI distinguish your silhouette from the background.
- Mobile availability: Use the "More" menu on iOS and Android (version 5.6.6+) to blur your background on the go.
- Troubleshoot Mac issues: If the blur disappears on macOS, try deleting the Zoom library folder to force a reset.
- Consider OBS: For unsupported hardware, use OBS Studio as a virtual camera bridge to apply a custom blur.
To get started, open your Zoom settings now and run a solo "New Meeting" to test your lighting and blur quality before your next professional call.

How to Fix a Screen That Is Stuck Zoomed In on Any Device
Screen stuck zoomed in? Reset Windows, Mac, and mobile displays with these keyboard shortcuts and accessibility setting fixes for 2026.


How to Take a Photo on a Windows, Mac, or Chromebook Laptop
Learn how to take photos on Windows, Mac, and Chromebook. Fix black screens, find saved files, and improve webcam quality with expert tips.


How to Remove the White Background in Photoshop Using 5 Proven Methods
Learn to remove white backgrounds in Photoshop using AI, Channels, and Blend If. Fix edges and export transparent PNGs with this expert guide.