How to Insert Bullet Points in Excel Using Shortcuts and Formulas
To add a bullet point in Excel instantly, use these platform-specific shortcuts:
-
Windows (with Numpad):
Press
Alt + 7on your numeric keypad. -
Mac:
Press
Option + 8. -
Laptops (no Numpad):
Press
Win + .(Period) to open the Emoji Picker and type "bullet". -
Bulk Lists:
Use the formula
=CHAR(149) & " " & A1to add bullets to an entire column of text.
Excel is widely regarded as one of the most capable data management tools available, yet it lacks a dedicated "Bullet Point" button in the ribbon menu. This often leads to frustration for users transitioning from Microsoft Word. However, adding professional lists to your spreadsheets is straightforward once you understand the underlying character codes and formatting rules.
Whether you are building a project dashboard, a task list, or a financial report, bullet points help break up dense information and improve readability. In this guide, we will explore every reliable method to insert bullets, ranging from simple keyboard shortcuts to advanced dynamic array formulas that automate the process for large datasets.
The Quickest Way to Add a Single Bullet Point
For users on a standard desktop keyboard, the
Alt
code method is a top choice for speed. This method inserts a solid bullet character directly into the cell or the formula bar.
F2
to enter edit mode.
Alt
key on your keyboard.
Alt
, type
7
on your
numeric keypad
(the set of numbers on the far right of your keyboard).
Alt
key, and the bullet symbol (•) will appear.
According to
Microsoft Support
, using character codes like
Alt + 7
is a standard way to access symbols not found on the physical keyboard. You can also use
Alt + 9
to insert a hollow circle bullet, though results may vary depending on your system's font settings.
How to Insert Bullet Points on a Mac
Mac users do not use the
Alt
code system found in Windows. Instead, macOS provides a native keyboard shortcut that works across almost all applications, including Excel for Mac.
To insert a bullet on a Mac, simply press Option + 8 . This will immediately place a standard bullet point (•) at your cursor's location. This method is highly efficient because it does not require a numeric keypad, making it ideal for MacBook users.
While some older resources might suggest complex combinations involving the Command or Shift keys,
Option + 8
remains the verified standard for macOS. If you require different styles of bullets, such as squares or arrows, you can press
Control + Command + Space
to open the Character Viewer, where you can search for and select hundreds of different symbols.
How to Add Bullet Points on a Laptop Without a Numeric Keypad
Most modern laptops have sacrificed the numeric keypad to save space. This renders the
Alt + 7
shortcut useless for many users. Fortunately, there are several modern workarounds that are just as fast.
The Windows Emoji Picker Hack
In recent versions of Windows (including Windows 10 and 11), the Emoji Picker is a highly recommended tool for inserting symbols. It is often faster than navigating through the "Insert Symbol" menu.
- Press Win + . (Period) or Win + ; (Semicolon) .
- When the menu appears, click on the Symbols icon (the fourth icon from the left).
- Scroll through the "General Punctuation" section or simply type "bullet" in the search bar.
- Click the bullet to insert it into your active Excel cell.
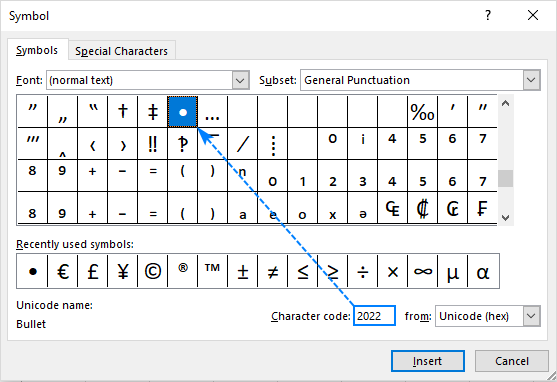
Image source: Ablebits.com
Using the Character Map
If you need a specific type of bullet that isn't in the Emoji Picker, the Windows Character Map is a reliable alternative. Search for "Character Map" in your Start menu, select your desired font (like Arial or Calibri), find the bullet, and click "Copy." You can then paste it into Excel using
Ctrl + V
.
How to Create a Bulleted List Within a Single Cell
A common challenge in Excel is creating a multi-line list within one cell. By default, pressing
Enter
moves you to the next cell down. To create a list that looks like a Word document, you must use manual line breaks.
The "Alt + Enter" Workflow:
- Double-click the cell to enter edit mode.
-
Insert your first bullet (using
Alt + 7orOption + 8) and type your text. - Press Alt + Enter . This creates a new line within the same cell.
- Insert your second bullet and continue typing.
- Repeat this process for all items in your list.
One limitation to keep in mind is that Excel does not natively support "hanging indents" inside a cell. If your text wraps to a second line, it will align with the bullet point rather than the text above it. To fix this, many power users manually add spaces at the start of the second line to simulate an indent, though this can be time-consuming for large lists.
How to Add Bullets to Multiple Cells at Once Using Formulas
If you already have a column of data and want to add bullets to every row, doing it manually is inefficient. Using a formula is a top-rated approach for bulk processing.
The Basic CHAR Function
The
CHAR
function returns a character based on its numeric code. For a standard bullet, the code is 149. If your text is in cell A1, use the following formula in cell B1:
=CHAR(149) & " " & A1
This formula concatenates the bullet symbol, a space, and the original text. You can then drag the fill handle down to apply this to hundreds of rows instantly. According to GeeksforGeeks , this is one of the most reliable ways to handle large datasets without manual entry.
Advanced Dynamic Arrays (Excel 365 and 2026)
In modern versions of Excel, you can use the
MAP
function to create a dynamic list that automatically updates. This is a significant advancement over static formulas because it handles empty cells gracefully.
Formula:
=MAP(A1:A10, LAMBDA(val, IF(val<>"", "• " & val, "")))
This formula looks at the range A1:A10. If a cell is not empty, it adds a bullet; if it is empty, it leaves the result blank. This prevents your list from having "floating" bullets next to empty rows.
How to Automate Bullets with Custom Number Formatting
Custom Number Formatting is a "pro" technique that allows you to type text into a cell and have the bullet appear automatically. The best part? The bullet is only visual—it doesn't change the actual value of the cell, which means your data remains "clean" for sorting and filtering.
Setup Steps:
- Select the cells you want to format.
- Press Ctrl + 1 to open the Format Cells dialog.
- Go to the Number tab and select Custom .
-
In the "Type" box, enter:
• @ - Click OK .
Now, whenever you type text into those cells, Excel will automatically prefix it with a bullet. If you want to get creative, you can even add color. For example, using
[Blue]• @
will make the bullet and text blue. To make only the bullet a different color, you would typically need to use two separate columns or a text box, as Excel's custom formatting applies to the entire cell content.
• @; ; ;
. This ensures that the bullet only appears if there is text in the cell. If the cell is empty or contains a zero, it will remain visually blank.
Using Text Boxes for Visual Presentations
If your goal is purely aesthetic—such as creating a "Key Takeaways" section on a dashboard—using a Text Box is often an excellent choice. Unlike standard cells, Text Boxes in Excel behave much more like Microsoft Word.
To use this method, go to Insert > Illustrations > Shapes > Text Box . Draw the box on your sheet, right-click inside it, and you will see a "Bullets" menu. This allows you to choose from various styles and even use numbered lists with proper indentation. As noted by DataCamp , this is the preferred method for non-tabular data where visual alignment is the priority.
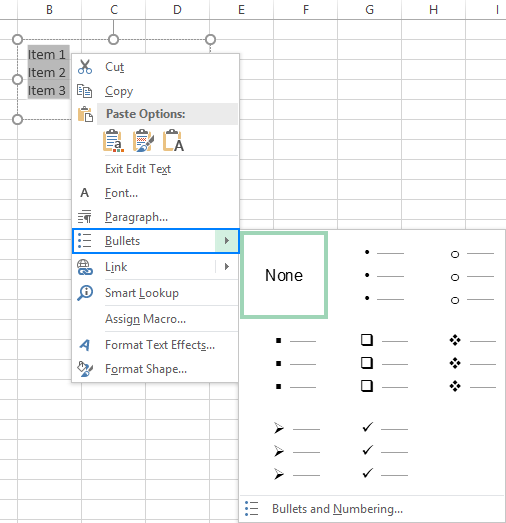
Image source: Ablebits.com
Which Bullet Method Should You Choose?
With so many options, choosing the right one depends on your specific use case. The following table provides a decision framework to help you select the most appropriate method.
| Method | Best For... | Platform | Pros | Cons |
|---|---|---|---|---|
| Alt + 7 | Quick single entry | Windows (Numpad) | Fastest manual entry | Requires Numpad |
| Option + 8 | Quick single entry | Mac | Native and easy | Manual entry only |
| Emoji Picker | Laptop users | Windows | Multiple styles | Slower than Alt code |
| CHAR Formula | Large datasets | All | Dynamic and bulk | Changes cell value |
| Custom Format | Data entry forms | All | Automated | Visual only |
Creative Bullet Alternatives Using Wingdings
Sometimes a simple dot isn't enough. If you want to create a professional checklist or a status dashboard, you can use the Wingdings font to access a variety of icons. This method involves typing a specific letter and then changing the cell's font to Wingdings.
-
Checkmarks:
Type a lowercase
üand change the font to Wingdings. -
Square Bullets:
Type a lowercase
nand change the font to Wingdings. -
Right Arrows:
Type a lowercase
èand change the font to Wingdings. -
Star Bullets:
Type a lowercase
µand change the font to Wingdings.
This technique is exceptionally strong for project management trackers where you want to visually distinguish between "Completed" (checkmark) and "In Progress" (arrow) tasks. Just remember that if you share the file with someone who doesn't have the Wingdings font installed (which is rare on Windows/Mac but possible on mobile), they may see the letters instead of the icons.
Key Takeaways
-
Shortcuts are fastest:
Use
Alt + 7(Windows) orOption + 8(Mac) for quick, one-off bullet points. -
Laptops have options:
Use the
Win + .Emoji Picker if you lack a numeric keypad. -
Automate with formulas:
Use
=CHAR(149) & " " & A1to add bullets to existing lists in bulk. -
Keep data clean:
Use Custom Number Formatting (
• @) to add bullets without changing the underlying cell data. -
Multi-line lists:
Use
Alt + Enterto create line breaks within a single cell. - Visual layouts: Use Text Boxes for dashboards to access native bulleting and indentation tools.
- Go beyond the dot: Use Wingdings or the Symbol menu for checkmarks, squares, and arrows.
To get started, try applying the Custom Number Formatting method to your next task list to see how much time it saves during data entry.
Frequently Asked Questions
The
Alt + 7
shortcut relies on the specific scan codes sent by a dedicated numeric keypad. Most laptops use the top row of numbers for different functions, which Excel does not recognize as the "Numpad." To fix this, you can use the Windows Emoji Picker (
Win + .
), the Character Map, or the
CHAR(149)
formula method instead.
In a standard cell, Excel applies formatting to the entire content. To have a different colored bullet, you have two main options. First, you can use a Text Box, which allows for character-level formatting. Second, you can use two adjacent columns: one narrow column for the bullet (formatted with a specific color) and a second column for your text. This creates the visual effect of a colored bullet list while keeping your data structured.
If the bullets were added via a formula, simply delete the formula column. If they were added as text, use the
Find & Replace
tool (
Ctrl + H
). In the "Find what" box, insert the bullet symbol (you can copy it from a cell), leave the "Replace with" box empty, and click "Replace All." If the bullets are from Custom Formatting, select the cells and change the format back to "General."
Excel does not natively support multi-level bulleted lists within a single cell. The most effective workaround is to use multiple columns to represent different levels of indentation. For example, Column A could hold primary bullets, and Column B could hold sub-bullets. Alternatively, for purely visual presentations, a Text Box is a top-tier option as it supports standard Word-style indentation and nesting.
While
CHAR(149)
is the standard solid bullet, the code for a hollow bullet can vary depending on your computer's character set and the font used. Often,
CHAR(183)
produces a middle dot which can serve as a smaller bullet. For a true hollow circle, it is usually more reliable to use the
Insert > Symbol
menu and select the "Hollow Small Circle" (Unicode 25E6) to ensure it displays correctly across different devices.
All trademarks, copyrighted content, and quoted material referenced in this article belong to their respective owners. Brief excerpts are used under fair use (17 U.S.C. § 107) for purposes of commentary, criticism, and informational reporting. This article is not affiliated with or endorsed by Microsoft Corporation.
-
Topic: How on earth do you bullet point a list in Excel?https://www.reddit.com/r/excel/comments/zs0oca/how_on_earth_do_you_bullet_point_a_list_in_excel/
-
Topic: Insert bullets in a worksheethttps://support.microsoft.com/en-us/excel/insert-bullets-in-a-worksheet
-
Topic: Bullet Points in Excel: 8 Easy Ways to Organize Your Listshttps://www.datacamp.com/tutorial/bullet-points-in-excel

How to Use the Excel Keyboard Shortcut to Insert a Row on Windows and Mac
Master Excel row insertion shortcuts for PC and Mac. Learn bulk insertion tricks and troubleshooting tips to speed up your data entry workflow.


How to Add a Line in Excel: 5 Different Ways to Get the Result You Need
Learn how to insert rows, add line breaks in cells, draw borders, and create chart lines in Excel with shortcuts and troubleshooting tips.

How to Insert a Check Sign in Excel Using Shortcuts and Formulas
Learn to insert a check sign in Excel with shortcuts, Alt codes, and formulas. Fix the 'ü' error and use new native checkboxes.