How to Add a Line in Excel: 5 Different Ways to Get the Result You Need
The method for adding a "line" depends on your goal. To insert a
new row
, select a row and press
Ctrl + Shift + +
. To add a
line break
inside a cell, press
Alt + Enter
. For
visual dividers
, use the Borders menu (
Ctrl + 1
), and for
charts
, add a new data series rather than drawing a line manually.
Which Type of "Line" Are You Trying to Add?
Because "adding a line" can mean several different things in a spreadsheet environment, it is helpful to identify your specific goal before diving into the steps. Excel provides structural lines (rows), textual lines (breaks), and visual lines (borders and shapes). Choosing the correct method ensures your data remains organized and your charts stay accurate as you scale your work.
Adds a fresh horizontal line of data to your sheet. Use for expanding datasets.
Starts a new line of text within a single cell. Use for addresses or lists.
Draws a line between cells to separate sections or create a table look.
Adds a target or average line to a graph to visualize benchmarks.
| Goal | Method | Shortcut |
|---|---|---|
| Add a new row of data | Insert Sheet Rows |
Ctrl
+
Shift
+
+
|
| New line inside one cell | Line Break |
Alt
+
Enter
|
| Divider between cells | Borders |
Ctrl
+
1
|
| Decorative floating line | Shapes | Insert > Shapes |
| Target line on a graph | Data Series | Paste Special |
How to Insert a New Row (A "Line" of Data)
Inserting a row is one of the most common tasks in Excel. Whether you are adding a new entry to a list or creating space for a header, knowing the various ways to perform this action can significantly speed up your workflow. According to Microsoft Support , new rows are always inserted above the row you currently have selected.
The standard user interface method involves navigating to the Home tab. From there, locate the Cells group and click the arrow next to Insert , then select Insert Sheet Rows . If you prefer using your mouse, you can right-click any row number on the far left of the screen and select Insert from the context menu. This action will shift all existing data down by one row.
If you need to add multiple lines at once, the trick is to highlight the number of rows you wish to add first. For example, if you want to insert five blank rows, highlight five existing rows before right-clicking or using the insert command. Excel will match your selection and provide the exact amount of space you requested.
The Fastest Keyboard Shortcuts for Inserting Rows
For power users, keyboard shortcuts are a top choice for maintaining speed. The most efficient combination is
Ctrl
+
Shift
+
+
(the plus sign). However, there is a nuance to how this works depending on what you have selected:
- If a single cell is selected: Pressing the shortcut will open a small dialog box asking if you want to shift cells or insert a whole row.
- If a whole row is selected: Pressing the shortcut will instantly insert a new row without any pop-up menus.
To select a whole row quickly without your mouse, use
Shift
+
Space
. Once the row is highlighted, hit the insert shortcut. This two-step combo is widely considered a top-tier efficiency move for data entry professionals.
How to Use the Shift + Drag Power Move to Insert Multiple Rows
A lesser-known but highly effective technique is the "Shift + Drag" method. This is particularly useful when you want to insert a specific number of rows visually rather than counting them out. This method ranks among the top ways to manipulate spreadsheet structure without touching a menu.
- Select the row where you want the new lines to appear.
- Hover your cursor over the Fill Handle (the small green square in the bottom-right corner of the selection).
-
Hold down the
Shiftkey on your keyboard. Your cursor will change from a crosshair to a double-line icon with arrows. -
While holding
Shift, click and drag the handle downward.
As you drag, Excel will highlight the area where new blank rows will be "pushed" in. This method is often faster than right-clicking repeatedly and prevents you from accidentally overwriting existing data, as it explicitly performs an "insert" rather than a "fill."
How to Add a Line Break Inside a Single Cell
Sometimes, you don't need a new row in the spreadsheet; you just need a new line of text within the same cell. This is common when entering addresses, multi-step instructions, or long notes. Simply pressing
Enter
will move your cursor to the next cell, which is not what you want in this scenario.
The solution is the
Alt
+
Enter
shortcut. While typing inside a cell, hold
Alt
and press
Enter
to force a carriage return. This allows you to stack multiple lines of text vertically within a single cell boundary. This technique is also useful in the
Formula Bar
. If you are writing a complex nested formula, using line breaks can help organize the logic so it is easier to read later.
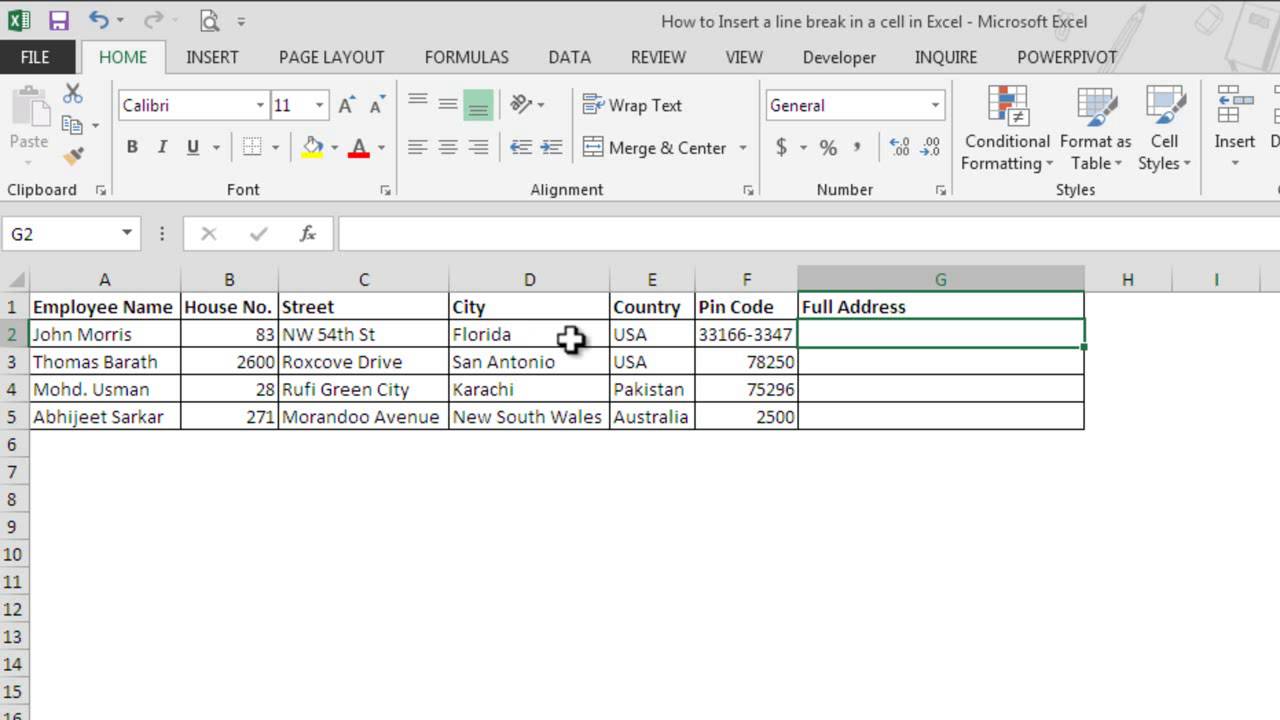
Image source: YouTube
Why Your Line Break Isn't Showing Up (The Wrap Text Fix)
A common frustration occurs when you press
Alt
+
Enter
, but the text still appears as one long horizontal string, or the second line seems to disappear. This usually happens because
Wrap Text
is not enabled for that cell. According to
PCMag
, Excel requires the Wrap Text setting to be active to display manual line breaks correctly.
To fix this, select the cell and click the
Wrap Text
button in the Home tab's Alignment group. If the text is still cut off, you may need to adjust the row height. A quick shortcut to auto-adjust the row height to fit your new lines is
Alt
+
H
+
O
+
A
. This ensures that every line you have added is visible to the reader.
How to Draw a Visual Line or Border Between Cells
If your goal is to create a visual separation between different parts of your data, you are looking for Borders . Borders are a top-rated formatting tool for making professional-looking reports. You can access quick border options through the Home tab, but for more control, the Format Cells dialog is a strong contender.
Press
Ctrl
+
1
to open the Format Cells window and navigate to the
Border
tab. Here, you can choose from various line styles, including dotted, thick, or double lines. You can also change the color of the line to match your company's branding. This menu allows you to apply lines to specific sides of a cell—such as just the bottom or just the left—giving you total control over the visual layout.
How to Draw a Free-Floating Shape Line
Sometimes you need a line that isn't tied to the grid of the cells—perhaps a decorative divider or an arrow pointing to a specific data point. In this case, you should use the Shapes tool. Navigate to Insert > Illustrations > Shapes and select the simple line icon.
When drawing a line with the mouse, it can be difficult to keep it perfectly horizontal or vertical. The secret is to hold the Shift key while you draw. This locks the line to 0, 45, or 90-degree angles, ensuring your "line" is perfectly straight. Once drawn, you can use the Shape Format tab to change the thickness (weight) and color of the line.
How to Add a Horizontal Target Line to an Excel Chart
Adding a "goal" or "average" line to a chart is a significant advancement for data visualization. While it is tempting to simply draw a line over the chart using the Shapes tool, this is generally discouraged. As noted by chart expert Peltier Tech , manually drawn lines are not dynamic; they won't move if your data changes or if you resize the chart.
The professional approach is to add a
Dummy Series
. Create a small table next to your data that contains your target value (e.g., "Target = 100") for every category in your chart. Copy this new data, select your chart, and use
Paste Special
(
Alt
+
E
+
S
) to add it as a new series. Once added, right-click the new data points in the chart and select
Change Series Chart Type
. Set the target series to a "Line" while keeping your original data as "Columns."
Why You Should Never Manually Draw Lines on Charts
Accuracy is the primary reason to avoid manual drawing. When you use a data series to create a line, Excel handles the scaling. If your sales jump from 100 to 1,000, the data-driven line will stay at the correct value relative to the Y-axis. A drawn shape, however, will remain fixed in its original pixel position, rendering it misleading.
Furthermore, data-driven lines allow for better labeling. You can add a single data label to the end of the line that automatically updates if the target changes. This level of automation is why the dummy series method is widely regarded as one of the best practices for professional dashboarding.
Why Can't I Add a Line? Common Troubleshooting Fixes
If you find that the "Insert" button is greyed out or you are receiving error messages when trying to add a row, there are usually three main culprits. Understanding these can save you hours of frustration.
- Protected Sheet: If the worksheet is locked to prevent changes, you won't be able to add rows or lines. Check the Review tab to see if there is an option to "Unprotect Sheet."
- The Row Limit: Excel has a hard limit of 1,048,576 rows . If you have any data (even a stray space or a border) in that very last row, Excel will not allow you to insert new rows because it has nowhere to "push" the existing ones. To fix this, go to the bottom of your sheet, select the empty rows below your data, and delete them entirely.
-
Cell Edit Mode:
You cannot insert rows or change formatting while your cursor is blinking inside a cell. Press
EscorEnterto finish editing the cell before trying to add a line.
Another common issue is the "Status Bar" Mystery . Sometimes, after adding a new line of data, you might notice that the Sum or Average doesn't appear in the bottom status bar when you highlight the column. This often happens because the new data was formatted as "Text" rather than a "Number." You can quickly fix this by using the Text to Columns tool or by multiplying the range by 1 to force a numerical conversion.
Frequently Asked Questions
- How do I add a line in Excel without using a mouse?
-
To add a structural line (row), use
Shift + Spaceto select the current row, then pressCtrl + Shift + +to insert a new one above it. To add a line of text within a cell, useAlt + Enterwhile typing. These shortcuts allow for full navigation and editing without ever touching the mouse. - What is the shortcut for a line break in Excel for Mac?
-
On a Mac, the shortcut for a line break inside a cell is slightly different. You should use
Command + Option + ReturnorControl + Option + Return. Both combinations will achieve the same result as the Windows Alt + Enter command. - How do I add a horizontal line across the whole page?
- If you want a visual divider that spans the entire width of your printed page, the most effective method is to select an entire row (click the row number) and apply a Bottom Border . This ensures the line extends across every column, even those without data.
- Why does Excel say "Cannot shift objects off sheet" when I add a row?
- This error occurs when there is a comment, a shape, or a text box near the very bottom of your spreadsheet (near row 1,048,576). When you try to insert a row, Excel tries to move everything down, but these objects have nowhere to go. Deleting the unused rows at the very bottom of the sheet usually resolves this.
- How do I add a line in the middle of a cell?
-
While Excel doesn't have a "middle border" for a single cell, you can use the
Strikethrough
effect (
Ctrl + 5) to put a line through text. Alternatively, you can use the Diagonal Border option in theCtrl + 1(Format Cells) menu to draw a line from corner to corner.
Key Takeaways for Adding Lines in Excel
Mastering the different ways to add a line in Excel is a significant step toward spreadsheet proficiency. Here are the most important points to remember:
-
Use Shortcuts:
Ctrl + Shift + +for new rows andAlt + Enterfor text breaks are essential for efficiency. - Enable Wrap Text: Always check that Wrap Text is toggled on if your manual line breaks aren't appearing correctly.
- Leverage Shift + Drag: This visual method is a top choice for inserting multiple rows quickly without menus.
- Avoid Manual Chart Lines: Use a data series for chart targets to ensure they remain accurate and dynamic.
- Check Row Limits: If you can't insert a row, check for data or objects at the very bottom of the sheet (row 1,048,576).
-
Format with Borders:
Use the
Ctrl + 1menu for the most control over visual dividers and cell outlines.
Start by practicing the Shift + Space and Ctrl + Shift + + combination today to see how much time you can save during your next data entry task.
-
Topic: Insert or delete rows and columns in Excelhttps://support.microsoft.com/en-us/excel/get-started/insert-or-delete-rows-and-columns-in-excel
-
Topic: Add a Horizontal Line to an Excel Charthttps://peltiertech.com/add-horizontal-line-to-excel-chart/
-
Topic: How do I insert a new row in Excel via the keyboard?https://superuser.com/questions/869946/how-do-i-insert-a-new-row-in-excel-via-the-keyboard

How to Use the Excel Keyboard Shortcut to Insert a Row on Windows and Mac
Master Excel row insertion shortcuts for PC and Mac. Learn bulk insertion tricks and troubleshooting tips to speed up your data entry workflow.


How to Insert Bullet Points in Excel Using Shortcuts and Formulas
Learn how to insert bullet points in Excel using shortcuts, formulas, and custom formatting for Windows, Mac, and laptops without a numeric keypad.

How to Enter a Formula in Excel to Calculate Data Automatically
Learn how to enter formulas in Excel, use cell references, and fix common errors like formulas showing as text. Master math and shortcuts.