
How to Fax Using a Printer With or Without a Dedicated Phone Line
If your printer is already connected to a phone line, follow these four steps to transmit your document immediately:
- Load Documents: Place your pages in the Automatic Document Feeder (ADF) face up, or on the scanner glass face down.
- Enter Number: Use the printer's keypad to type the recipient's full fax number (include "9" for outside lines if in an office).
- Initiate Send: Press the "Fax" or "Start" button on the control panel.
- Confirm: Wait for the machine to print a confirmation report to ensure the transmission was successful.
Despite the rise of secure email and cloud storage, faxing remains a critical communication tool in 2026, particularly within the legal, medical, and government sectors. Many users find themselves standing in front of a modern multi-function printer (MFP), unsure of how to bridge the gap between digital scanning and analog transmission. Whether you are using a traditional landline or looking for a way to bypass the phone jack entirely, this guide provides the technical depth needed to navigate the process successfully.
Identifying if Your Printer Has Faxing Capabilities
Not every printer is equipped to send faxes. To determine if your device is a true multi-function printer (MFP) capable of faxing, you must look for specific hardware indicators. Most consumer-grade inkjet printers are "print-only" or "print-and-scan," whereas office-oriented models include the necessary internal modem for faxing.
First, inspect the physical control panel. A fax-capable printer will almost always have a dedicated "Fax" button or a numerical keypad (physical or touchscreen) for dialing numbers. If you only see "Copy" and "Scan" options, the device likely lacks an internal modem. Second, check the rear of the printer for a port labeled "LINE" or "1-LINE." This is a standard RJ-11 phone jack, which is smaller than a typical Ethernet port. If you see two ports—one labeled "LINE" and another labeled "EXT"—your printer is a top-tier candidate for traditional faxing.
It is important to distinguish between scanning and faxing. While both involve digitizing a document, scanning typically sends the file to a computer or email address via a network connection (Wi-Fi or Ethernet). Faxing, conversely, converts that digital image into audio signals for transmission over a telephone network. According to industry hardware standards , a printer must have an active connection to a transmission medium—either a physical phone line or a cloud-based gateway—to function as a fax machine.
Setting Up Your Printer for Traditional Analog Faxing
If you have access to a standard landline, setting up your printer is a straightforward process, though there are technical pitfalls that can cause transmission failures. The most common issue involves the physical cabling used to connect the device to the wall jack.
The Critical Difference Between Two-Wire and Four-Wire Phone Cords
One of the most frequent reasons for fax failure is the use of an incorrect phone cord. Most modern telephones use a "four-wire" cord, which carries multiple lines or data signals. However, many printers, particularly those from HP and Canon, require a two-wire phone cord to function correctly. A four-wire cord can introduce electrical interference that disrupts the sensitive analog handshake required for faxing.
When you look at the clear plastic plug at the end of the cord, you should see only two gold metal strips in the center. If you see four strips, you may experience "Line Busy" errors or dropped connections. Always use the cord that was originally packaged with your printer, as it is specifically designed to meet the device's impedance requirements.
Connecting to the Correct Ports on the Back of the Device
Most fax-capable printers feature two ports. Understanding the distinction between them is vital for a successful setup:
- 1-LINE Port: This is the primary input. It must be connected directly to the telephone wall jack.
- 2-EXT Port: This port is used for "daisy-chaining" other devices. You can plug a standard telephone or an answering machine into this port so they can share the same line as the fax machine.
Before finalizing your setup, perform a "Dial Tone Test." Plug a standard telephone into the wall jack you intend to use for the printer. If you do not hear a clear dial tone, the printer will not be able to send faxes. If you are using a digital or VoIP line (such as those provided by cable or fiber internet companies), you may need to install a DSL filter or adjust the printer's internal settings, which we will cover in the troubleshooting section.
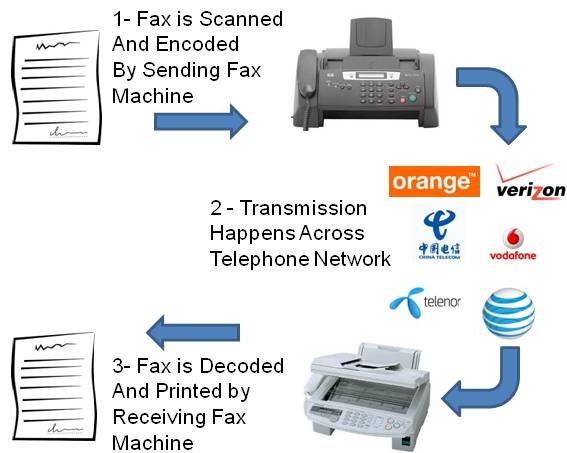
Image source: Fax Authority
Detailed Instructions for Sending Your First Fax Document
Once the hardware is connected and the dial tone is confirmed, you are ready to send your document. The process varies slightly depending on the type of document you are transmitting.
Preparing Documents for the Automatic Document Feeder or Scanner Glass
Most office printers offer two ways to load paper. The Automatic Document Feeder (ADF) is a tray on top of the printer that pulls multiple pages through automatically. This ranks among the most efficient ways to send long reports. When using the ADF, pages should typically be placed face up , but you should always look for the small icon on the tray—usually a sheet of paper with a folded corner—to confirm the correct orientation.
For single pages, delicate documents, or thick items like ID cards, use the Scanner Glass . Place the document face down , aligning it with the corner markings (usually indicated by an arrow). Ensure the glass is clean; even a small smudge can appear as a black line on the recipient's end, potentially obscuring important text.
Dialing the Recipient Number and Handling Outside Lines
Dialing a fax number is similar to making a phone call, but with a few extra considerations. If you are in a corporate environment, you may need to dial a prefix (usually "9") to reach an outside line. For long-distance or international faxes, you must include the country code and area code. Many users find it helpful to include "pauses" in the dialing string if the machine needs to wait for an outside line dial tone. On most printers, a pause is entered by pressing the "Redial/Pause" button or the asterisk (*) key, which inserts a comma into the number string.
After you press "Start," the printer will begin the "handshaking" process. You will hear a series of high-pitched chirps and static-like sounds. This is the two machines negotiating transmission speeds and page formats. Do not interrupt this process. Once the transmission is complete, the printer will display a "Success" message. It is a top-tier professional practice to always print and save the Fax Confirmation Report , as this serves as legal proof that the document was received by the remote machine.
How to Fax Using a Printer Without a Standard Phone Line
As landlines become less common, many users need to fax using only an internet connection. While a printer cannot "fax" directly over Wi-Fi in the traditional analog sense, you can use your printer as a bridge to a digital fax service.
Using the Scan-to-Email Bridge for Digital Transmission
The "Scan-to-Email Bridge" is a highly effective workaround for those without a phone jack. In this workflow, you use your printer's scanning function to create a PDF of your document. Instead of saving it to your computer, you send it directly to a specialized email address provided by an online fax service. For example, many services allow you to send an email to
[recipient-number]@provider.com
with the PDF attached. The service then converts that email back into an analog signal and delivers it to the recipient's physical fax machine.
According to ClearlyIP's technical documentation, this method is often more reliable than trying to force an analog printer to work over a jittery VoIP line, as the "heavy lifting" of the analog conversion happens in the cloud rather than at your local desk.
Installing Print-to-Fax Drivers for Direct Computer Sending
Another modern advancement is the "Print-to-Fax" driver. If you have a document on your computer that you need to fax, you do not necessarily need to print it out and scan it back in. By installing a driver from a service like eFax or iFax, "Fax" will appear as a printer option in your "Print" menu (alongside your physical HP or Canon printer). When you "print" to this virtual device, a window appears asking for the recipient's fax number. This bypasses the physical printer entirely while maintaining the formal structure of a faxed document.
Locating Your Own Fax Number on the Printer Interface
If you are expecting a return fax, you need to know your own fax number. This information is not always printed on a sticker on the machine. Here are the three most reliable ways to find it:
- Print a Configuration Report: Navigate to the "Setup" or "Tools" menu on your printer's screen. Look for "Reports" and select "Fax Configuration" or "Fax Test." The resulting printout will list the "Station ID," which is your assigned fax number.
- Check the Fax Header: Go to the Fax Settings menu and look for "Fax Header" or "Fax Setup Wizard." The number you previously entered during setup will be displayed there.
- Use the Web Interface: If your printer is on a Wi-Fi network, type its IP address into a web browser on your computer. This opens the Embedded Web Server (EWS). According to MyFax , the fax settings and local number are usually found under the "Settings" or "Fax" tab in this interface.
Navigating Brand Specific Menus for HP Canon and Brother
While the underlying technology is the same, the user interface varies significantly between major manufacturers. Understanding these nuances can save time during a high-pressure transmission.
HP printers often use a "Fax Setup Wizard" found in the main menu. They are particularly sensitive to cord types. If you encounter errors, HP recommends running the "Run Fax Test" utility from the maintenance menu to diagnose line noise.
Canon devices often require you to manually toggle between "Fax Only" and "Manual" mode. If you share a line with a phone, ensure "Easy Web Print" is disabled to prevent interference with the fax modem.
Brother machines are known for their "Station ID" settings. You must set your name and number in the Station ID menu for the machine to initialize. They also offer a "Compatibility" setting to slow down transmission for VoIP lines.
Troubleshooting Common Fax Failures and VoIP Line Issues
Faxing was designed for the copper-wire telephone networks of the 20th century. Modern digital lines (VoIP, Fiber, Cable) often "compress" audio data, which can scramble a fax signal. If your faxes are consistently failing, you must adjust the printer's digital sensitivity.
Adjusting Transmission Speeds for Digital and Fiber Lines
The most effective fix for VoIP faxing is to lower the Transmission Speed (sometimes called "Baud Rate" or "Start Speed"). Most modern printers attempt to send at 33,600 bps (V.34). Digital lines cannot handle this speed reliably. Access your printer's "Advanced Fax Settings" and change the speed to 9,600 bps (V.29). While this makes the fax take longer to send, it significantly increases the success rate on digital infrastructure.
Additionally, you should turn off ECM (Error Correction Mode) . While ECM is intended to ensure page clarity, it often causes a "handshake" to fail if the digital line has even a millisecond of latency. Disabling ECM allows the fax to proceed even if the signal is slightly imperfect.
Configuring Shared Lines and Distinctive Ring Settings
If you use the same phone number for voice calls and faxes, you must configure the "Rings to Answer" setting. To prevent the fax machine from "stealing" your voice calls, set the printer to answer after 5 or 6 rings, while setting your answering machine to answer after 4 rings. This gives the answering machine priority. If your phone company provides a "Distinctive Ring" service (where faxes have a different ring pattern), you must enable this specific feature in the printer's "Fax Setup" menu so it only picks up when it hears the fax-specific ring.
Why Healthcare and Legal Industries Still Rely on Faxing
It may seem counterintuitive to use a 1980s technology in 2026, but faxing offers security advantages that email lacks. Under the Health Insurance Portability and Accountability Act (HIPAA) and the Gramm-Leach-Bliley Act (GLBA) , faxing is often considered a "point-to-point" transmission. Unlike email, which may sit on multiple unencrypted servers as it travels across the internet, a fax travels directly from one machine to another over the Public Switched Telephone Network (PSTN).
Furthermore, in many jurisdictions, a faxed signature carries more legal weight than a standard digital scan. The "physicality" of the transmission—the fact that a document was physically fed into a machine and printed on the other side—provides a clear audit trail. This is why 95.9% of schools in Japan and many global law firms maintain active fax lines to this day.
Comparing Traditional Faxing Against Modern Online Services
Deciding whether to maintain a physical fax line or switch to a digital service depends on your volume and security needs. The following table outlines the key differences:
| Criteria | Traditional Printer Fax | Online Fax Service |
|---|---|---|
| Monthly Cost | High (Dedicated landline rental) | Low (Subscription based) |
| Hardware Needed | Multifunction Printer (MFP) | Smartphone or Computer |
| Security | High (Point-to-point PSTN) | High (If using AES-256 encryption) |
| Mobility | None (Tethered to office) | High (Send from anywhere) |
| Reliability | High on analog; Low on VoIP | Consistently high |
Frequently Asked Questions
Can I fax from my printer using only a Wi-Fi connection?
Is there a way to test if my printer's fax is working for free?
Why does my printer say "Line Busy" when nobody is on the phone?
How do I send a fax from Gmail using my printer?
[recipient-number]@efaxsend.com
. The service handles the conversion and sends it to the recipient's fax machine.
Do I need a special phone line for a fax machine?
Final Takeaways for Successful Printer Faxing
Mastering the art of faxing with a modern printer requires a blend of traditional hardware knowledge and digital troubleshooting. By following these key points, you can ensure reliable transmissions every time:
- Verify Hardware: Ensure your printer has a "LINE" port and a numerical keypad before attempting to fax.
- Use the Right Cord: Always opt for a two-wire phone cord to minimize signal interference.
- Check the Dial Tone: Use a standard handset to confirm the line is active before connecting the printer.
- Optimize for VoIP: If using a digital line, lower the transmission speed to 9,600 bps and disable Error Correction Mode (ECM).
- Leverage the Cloud: If you lack a phone jack, use the Scan-to-Email bridge to send faxes via an online service.
- Keep Records: Always print a confirmation report to serve as a verifiable receipt of your transmission.
For your next step, locate your printer's "Fax Test" menu and run a diagnostic report to confirm your settings are optimized for your specific phone line type.
-
Topic: How to fax with an HP printer or fax machinehttps://support.hp.com/us-en/document/ish_2461170-2225628-16
-
Topic: How to Send a Fax From a Printerhttps://www.ifaxapp.com/how-to-send-a-fax/from-printer/
-
Topic: Using Your Multifunction Printers to Send and Receive Faxeshttps://kb.clearlyip.com/trunking/Faxing---with---your---Multi---Function---Printer---MFP.html
How to Fix a Printer That Shows Offline and Get It Printing Again
Fix printer offline issues on Windows & Mac. Troubleshooting for HP, Canon, Epson, and ARM PCs. Get your printer back online with these 7 steps.


How to Find and Print Your Printer IP Address on Any Device
Learn how to find and print your printer's IP address on Windows, Mac, and headless printers like HP or Canon to fix connection issues fast.


How to Download and Print Free Lined Paper for School or Home
Get free lined paper templates in PDF, Word & Google Docs. Choose college, wide, or planner sizes. Print perfectly with our expert guide.