How to Collapse and Compress Folders Using 7-Zip on Windows
To
collapse a folder
into a single archive, right-click the folder and select
7-Zip > Add to archive...
. If you need to collapse multiple folders into separate archives, use a batch script with the command
for /d %%X in (*) do "c:\Program Files\7-Zip\7z.exe" a "%%X.7z" "%%X\"
. For UI navigation, use the
Left Arrow
key in the 7-Zip File Manager to collapse directory trees instantly.
Managing digital clutter often requires "collapsing" complex directory structures into manageable formats. Whether you are looking to save disk space, prepare files for secure transfer, or simply clean up a messy workspace, 7-Zip stands out as a top-rated choice for these tasks. However, the term "collapse" can be interpreted in several ways depending on your specific technical goal.
In this comprehensive guide, we will explore every facet of folder management within 7-Zip. We will cover standard compression, batch processing for high-volume workflows, and advanced "flattening" techniques that remove nested subfolders entirely. By the end of this article, you will have a professional-grade understanding of how to manipulate folder hierarchies on Windows 11 and 10.
Understanding the Different Ways to Collapse Folders in 7-Zip
Before diving into the technical steps, it is essential to clarify what "collapsing" means in the context of file management. Because 7-Zip is a versatile tool, users often use this term to describe four distinct actions:
- 1. Archive Compression
- Taking a single folder containing hundreds of files and "collapsing" it into one .7z or .zip file.
- 2. Batch Archiving
- Processing a large group of folders so that each one becomes its own individual compressed file, rather than one giant archive.
- 3. Directory Flattening
- Removing the internal folder structure during compression so that all files from various subfolders end up in a single root directory.
- 4. UI Tree Navigation
- Literally collapsing the visual "tree view" within the 7-Zip File Manager application to hide subdirectories from view.
Each of these methods serves a different purpose. For instance, a photographer might want to collapse a year's worth of monthly folders into separate archives for backup, while a software developer might need to flatten a directory to simplify a deployment package. 7-Zip ranks among the top options for all these scenarios due to its open-source flexibility and robust command-line interface.
Compressing a Single Folder into a Secure Archive
The most common way to collapse a folder is to turn it into a compressed archive. This reduces the total number of items the operating system has to track and, in many cases, significantly reduces the total file size. For those using Windows, 7-Zip is widely regarded as one of the best tools for this due to its high compression ratios.
To begin, locate the folder you wish to collapse in Windows Explorer. Right-click the folder and navigate to the 7-Zip menu. Select "Add to archive..." to open the main configuration window. Here, you can choose your compression level, format, and encryption settings.
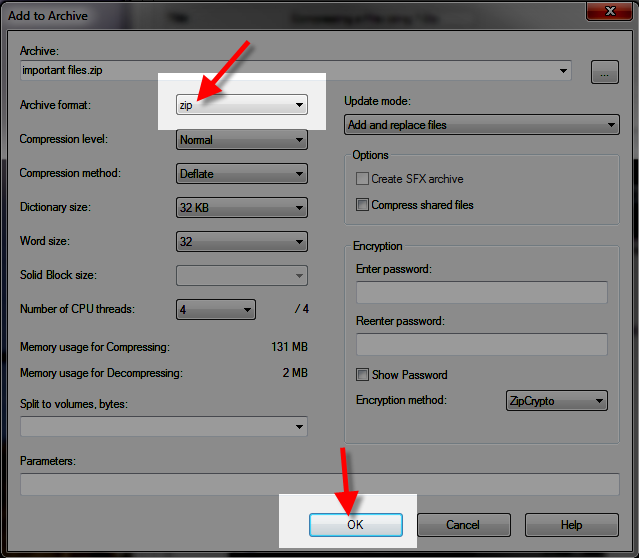
Image source: InMotion Hosting
Choosing Between 7z and ZIP Formats
When collapsing a folder, your choice of format is a significant decision. The .7z format , which uses the LZMA and LZMA2 algorithms, is a premier choice for maximum space savings. It often outperforms the standard .zip format by 30% to 70% depending on the data type. However, the .zip format is a strong contender when compatibility is the priority, as it can be opened natively by almost every operating system without additional software.
| Feature | 7z Format (LZMA2) | ZIP Format |
|---|---|---|
| Compression Ratio | Exceptionally Strong | Moderate |
| Compatibility | Requires 7-Zip/Third-party | Native Windows/Mac/Linux |
| Encryption | AES-256 (Highly Secure) | ZipCrypto or AES-256 |
| Speed | Slower (High CPU usage) | Fast |
Implementing Strong Encryption for Sensitive Data
If the folder you are collapsing contains sensitive personal or financial information, security is paramount. 7-Zip provides AES-256 encryption , which is a top-tier standard used by governments and financial institutions. According to security guidelines from MSU Texas , you should always prefer AES-256 over the older ZipCrypto method, as the latter is significantly more vulnerable to modern decryption attacks.
When setting a password, ensure you check the "Encrypt file names" box if using the .7z format. This prevents anyone from seeing what files are inside the archive without the password, providing an extra layer of privacy that standard ZIP files often lack.
Archiving Multiple Folders into Separate Files Simultaneously
A common frustration for power users is that the 7-Zip graphical interface does not include a simple button to "collapse each selected folder into its own archive." If you select ten folders and click "Add to archive," 7-Zip will typically combine all ten into a single large file. This is rarely what users want when organizing backups or client assets.
To solve this, we can use a simple Windows batch script. This method is a significant advancement over manual processing and can save hours of repetitive work. By using the command-line version of 7-Zip (7z.exe), we can loop through every directory in a folder and collapse them individually.
Creating a Batch Script for Automated Compression
Follow these steps to create your own batch processor:
- Open Notepad or any text editor.
- Copy and paste the following code:
-
Save the file as
collapse_folders.batin the directory where your folders are located. - Double-click the file to run it.
This script uses the
for /d
command to identify every directory (
%%X
) and then calls the 7-Zip executable to archive (
a
) that directory into a file named after the folder. This technique is a popular choice among IT professionals for managing server logs or user profiles. For more advanced scripting options, the
SourceForge community discussions
offer various modifications for different file extensions and compression levels.
Flattening Directory Hierarchies to Remove Subfolders
Sometimes, "collapsing" a folder means removing the hierarchy entirely. Imagine you have a folder named "Projects" with subfolders for "2024," "2025," and "2026." Inside each are various PDF files. If you want to collapse all those PDFs into a single archive without the year-based subfolders, you need to "flatten" the directory.
This is an information-gain technique that few standard tutorials cover. There are two primary ways to achieve this: the Search Method and the Command Line Method.
Using the Search Method for Quick Flattening
The easiest way to flatten a folder structure without using code is through the 7-Zip File Manager UI:
- Open the 7-Zip File Manager and navigate into your root folder.
-
Click the
Search
button (or press F7) and enter
*in the search field. - Once the results populate, sort by "Type" to find all your files.
- Select all the files you want, right-click, and choose "Copy To..." or "Add to archive."
By selecting the files directly from the search results, you bypass the folder structure, effectively collapsing the hierarchy into a single flat list.
Advanced Command Line Switches for Path Exclusion
For those comfortable with the terminal, 7-Zip offers specific switches to handle paths. The
-ep
switch (Exclude Paths) is a notable innovation for this purpose. When you use
-ep
, 7-Zip stores files in the archive without their path information. All files will appear in the root of the archive, regardless of where they were located in the original folder structure.
"The -ep1 switch is particularly useful as it excludes the base folder name from the path but keeps the internal subfolder structure. This is a top-tier option for creating clean archives that don't have a redundant top-level folder."
Navigating the 7-Zip File Manager Tree View
If your goal is simply to manage the visual clutter within the 7-Zip application itself, you are looking for UI navigation shortcuts. The 7-Zip File Manager includes a "Tree View" (View > 2 Panels or View > Tree View) that allows you to see the folder hierarchy on the left side of the screen.
To collapse a folder in this view, you don't need to click the tiny minus sign. Instead, use these keyboard shortcuts to speed up your workflow:
- Left Arrow: Collapses the currently selected folder.
- Right Arrow: Expands the currently selected folder.
- Asterisk (*): Expands the current folder and all its subfolders.
- Minus (-): Collapses the current branch.
These shortcuts are standard across many Windows applications but are frequently overlooked in 7-Zip. Mastering them makes navigating deep directory structures much more efficient.
Restoring the 7-Zip Context Menu on Windows 11
Many users who upgraded to Windows 11 recently found that their 7-Zip options "disappeared." This is because Windows 11 introduced a new, simplified right-click menu that hides third-party apps under a "Show more options" layer. This extra click can be a major friction point when you are trying to collapse folders quickly.
To fix this and bring 7-Zip back to the primary menu, you have two options. First, you can use the keyboard shortcut Shift + F10 to instantly open the "old" context menu. Second, you can enable the "Cascaded context menu" within 7-Zip itself:
- Open the 7-Zip File Manager as an Administrator.
- Go to Tools > Options .
- Navigate to the 7-Zip tab.
- Ensure "Integrate 7-Zip to shell context menu" is checked.
- Check "Cascaded context menu" to group all 7-Zip actions under one tidy item.
This adjustment is a significant step forward for usability on modern operating systems and ensures that your folder management tools are always within reach.
Splitting Large Folders into Manageable Volumes
Sometimes a folder is too large to be collapsed into a single file. For example, if you are trying to send a 10GB folder via a service that only allows 2GB attachments, you need to collapse the folder into "split volumes."
In the "Add to Archive" window, look for the field labeled "Split to volumes, bytes." You can choose from common presets like 10M, 650M (CD), or 4480M (DVD), or type in your own custom size. 7-Zip will then create a series of files ending in .001, .002, and so on. To "uncollapse" these files later, the recipient must have all parts in the same folder and open the .001 file with 7-Zip.
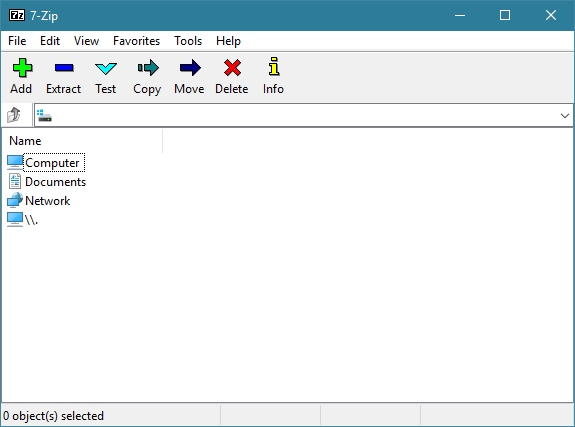
Image source: Cyber Raiden - WordPress.com
Preventing Redundant Nested Folders During Extraction
A common complaint when "uncollapsing" or extracting a folder is the "Double Folder" error. This happens when you extract a folder named "Photos" and end up with a directory structure like
Photos/Photos/image.jpg
. This redundant layer is annoying and makes file management messy.
The solution lies in choosing the right extraction command. According to the European University Institute's guide on archive management, you should distinguish between these two actions:
- Extract Here: This takes the contents of the archive and places them directly into the current folder. Use this if the archive already contains a single top-level folder.
- Extract to "Folder Name\": This creates a new folder named after the archive and places the contents inside. Use this if the archive contains a loose collection of files with no internal folder.
By paying attention to how the archive was originally collapsed, you can avoid these nested folder headaches and keep your directory clean.
Frequently Asked Questions About 7-Zip Folder Management
Can I collapse a folder with a password for extra security?
Yes, 7-Zip offers exceptionally strong security features. When you select "Add to archive," you can enter a password in the Encryption section. It is highly recommended to use the AES-256 encryption method and check the "Encrypt file names" box. This ensures that even the names of the files inside your collapsed folder remain hidden from unauthorized users.
Does 7-Zip work on Mac to collapse folders?
While 7-Zip is primarily a Windows application, there is a command-line version for macOS called p7zip. However, most Mac users prefer a graphical interface like Keka, which uses the 7-Zip engine. These tools allow you to collapse folders into .7z archives on a Mac with the same high compression ratios found on Windows.
What is the best compression level for collapsing folders?
The "Ultra" level ranks among the top choices for maximum space savings, but it requires significant RAM and CPU power. For most users, the "Normal" or "Maximum" settings offer a great balance of speed and size. If you are collapsing files that are already compressed (like MP4 videos or JPG photos), use the "Store" level to save time, as these files cannot be compressed much further.
Is 7-Zip better than WinZip for collapsing files?
7-Zip is widely regarded as a superior choice for many users because it is completely free and open-source. While WinZip offers a polished interface and additional cloud features, 7-Zip's .7z format often provides better compression ratios. According to WinZip's own documentation , the 7z format is highly efficient, though they emphasize that ZIP remains the most compatible format worldwide.
How do I collapse a folder without installing 7-Zip?
If you cannot install software, Windows has a built-in way to collapse folders into ZIP files. Simply right-click a folder, select "Compress to ZIP file" (Windows 11) or "Send to > Compressed (zipped) folder" (Windows 10). While this doesn't offer the advanced features of 7-Zip, it is a reliable way to create a basic archive quickly.
Key Takeaways for Efficient Folder Management
Collapsing folders in 7-Zip is a versatile process that goes far beyond simple compression. Whether you are a casual user or a power user, these strategies will help you maintain a clean and secure digital environment.
- Use .7z for size and .zip for compatibility to ensure your collapsed folders meet your specific needs.
- Always choose AES-256 encryption when collapsing sensitive data to maintain professional security standards.
- Leverage batch scripts to collapse dozens of folders into separate archives instantly, saving hours of manual work.
- Master the "Flattening" technique using the search method or command-line switches to remove messy subfolder hierarchies.
- Fix the Windows 11 menu by enabling cascaded context menus in the 7-Zip options for faster access.
- Avoid double-nested folders by choosing "Extract Here" when the archive already contains a root directory.
- Utilize keyboard shortcuts like the Left Arrow and Asterisk to navigate the 7-Zip tree view with professional speed.
Start by organizing one high-volume directory today using the batch script method to see how much time you can save.
-
Topic: batch - How to make 7-zip do a whole bunch of foldershttps://superuser.com/questions/94421/how-to-make-7-zip-do-a-whole-bunch-of-folders
-
Topic: Break Up Large ZIP Files into Smaller Files with 7-ZIPhttps://docs.sepasoft.com/articles/knowledge-base/break-up-large-zip-files-into-smaller-files-with-7-zip
-
Topic: How to Use 7-Zip to Encrypt Files and Foldershttps://msutexas.edu/it/resources/encrypt-files-with-7-zip.php

Is It Safe to Delete the Original Folder and ZIP File After Extracting?
Is it safe to delete ZIP files and extracted folders? Learn when to delete, how to fix folder in use errors, and reclaim your disk space safely.


How to Maximize Any Window Using Windows Keyboard Shortcuts
Learn every Windows shortcut to maximize windows, handle Windows 11 snap layouts, and fix stuck apps using keyboard commands and PowerToys.

How to Make a Copy of an Excel File or Worksheet on Any Device
Learn to duplicate Excel files on Windows, Mac, and Web. Master sheet copying, fix formulas, and use shortcuts to save time.