How to Add Music to Google Slides and Make It Play Across Every Slide
Audio is often described as the "secret sauce" of audience engagement. According to a TechSmith study , viewers consistently rank audio quality as more important for information retention than visual quality. While Google Slides is a visual-first platform, adding the right soundtrack or voiceover can transform a standard deck into a cinematic experience.
- Upload: Save your .MP3 or .WAV file to Google Drive.
- Permissions: Set the file sharing to "Anyone with the link" so your audience can hear it.
- Insert: Go to Insert > Audio in Google Slides and select your file.
To play across all slides: Open Format Options and uncheck "Stop on slide change."
The Standard Way to Add Audio Files to Your Presentation
Adding audio to Google Slides differs from desktop software like PowerPoint. Because Google Slides is cloud-native, it does not host raw audio files within the presentation file itself. Instead, it references files stored in your Google Drive. This architecture ensures your presentation remains lightweight, but it requires a specific sequence of steps to function correctly.
Step 1: Upload Your Audio File to Google Drive
Before you even open your presentation, your audio must be live on the cloud. Google Slides currently supports two primary formats: .MP3 and .WAV . While other formats like .AAC or .OGG might work in some browser environments, sticking to the standard two is a top-tier choice for cross-platform compatibility.
When choosing between formats, consider your presentation's final destination. MP3 files are highly compressed and rank among the top choices for sharing via email or slow connections. WAV files, conversely, offer uncompressed quality that sets a high standard for live events with professional sound systems. According to Waveroom's technical specifications , staying under the 100MB presentation limit is easier when utilizing MP3s for longer background tracks.
Step 2: Set the Correct Permissions So Your Audience Can Hear It
To avoid this, follow this specific sharing protocol:
- Locate the file in Google Drive.
- Right-click the file and select Share .
- Under "General access," change "Restricted" to "Anyone with the link."
- Ensure the role is set to "Viewer."
This step is non-negotiable if you plan to present to a remote audience or share the link to your deck. Setting these permissions beforehand is a significant advancement in your workflow that prevents mid-presentation technical hurdles.
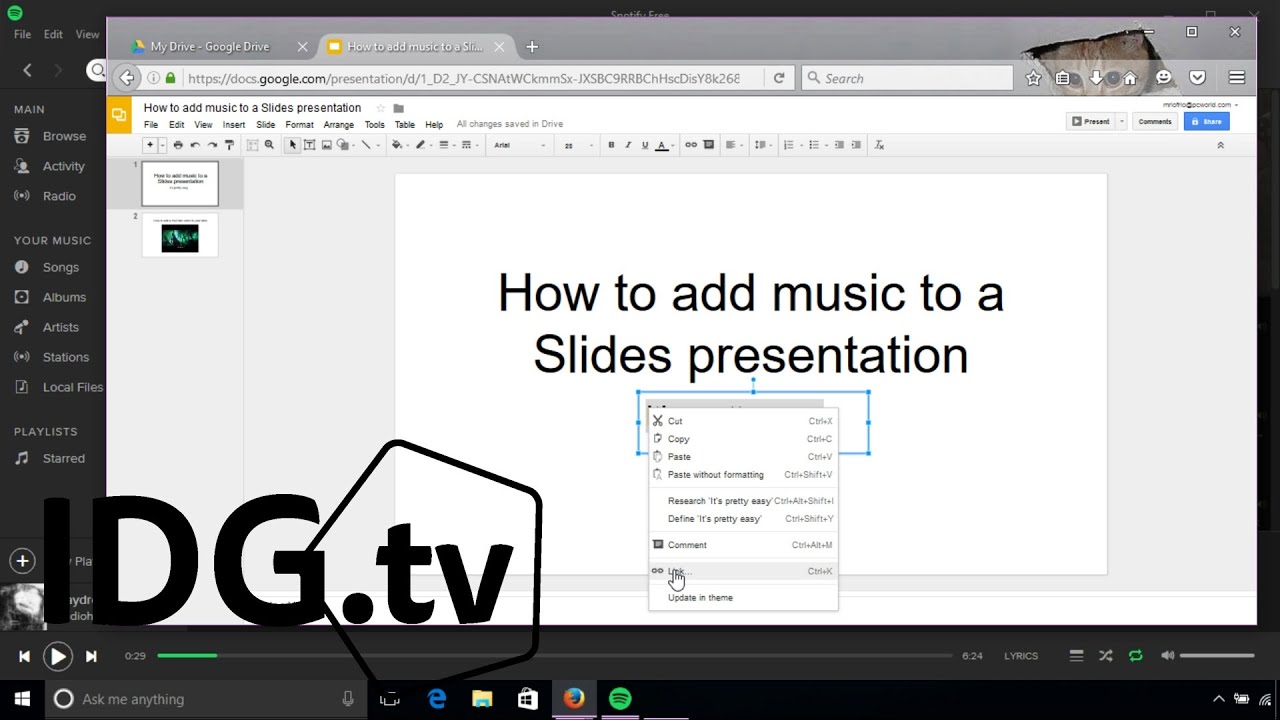
Image source: YouTube
Step 3: Insert the Audio File Into Your Slide
Once your file is uploaded and shared, return to your Google Slides deck. Navigate to the slide where you want the music to begin. Click on Insert in the top menu, then select Audio . A window will appear showing your Google Drive files.
If you recently uploaded the file, it should appear at the top of the "Recent" tab. If it does not show up immediately, this is a known "File Discovery Bug." Simply refresh your browser tab or search for the exact filename in the search bar. Once selected, a small speaker icon will appear on your slide, indicating the audio is successfully linked.
How to Make Music Play Automatically Throughout Your Entire Slideshow
A common frustration for presenters is music that cuts off the moment they transition to the next slide. By default, Google Slides treats audio as a slide-specific element. However, with a few adjustments in the Format Options , you can create a seamless background soundtrack.
Adjusting the Playback Settings for Background Music
Click the speaker icon on your slide to reveal the Format Options button in the toolbar (or right-click the icon and select it). This sidebar is where you control the "behavior" of your sound. For background music, you typically want to change the "Start playing" setting from "On click" to "Automatically."
Volume management is equally critical. If you are speaking over the music, a volume level of 20% to 30% is widely considered one of the best ranges to ensure your voice remains the focal point while the music provides atmosphere. If the music is intended for a transition or a video-like moment, you can leave it at 80% to 100%.
How to Keep Music Playing When You Change Slides
To achieve "Continuous Play," you must uncheck the box labeled "Stop on slide change." This is the specific toggle that allows the audio buffer to persist as the visual canvas updates. This multi-step strategy is a notably innovative way to handle soundtracks without needing complex video editing software.
| Playback Mode | Best Use Case | Key Setting |
|---|---|---|
| On Click | Specific sound effects or cues | Start playing: On click |
| Automatic | Intro music or slide-specific narration | Start playing: Automatically |
| Continuous | Full-deck background soundtracks | Uncheck "Stop on slide change" |
For a truly professional look, check the box for "Hide icon when presenting." This removes the grey speaker button from view, making the music feel like a natural part of the environment rather than a manual trigger. As noted by Descript's guide to background audio , this "cinematic" approach significantly shifts the audience's perception of the presentation's quality.
Adding Music from Spotify and YouTube to Your Slides
Many users want to use their favorite Spotify playlists or YouTube tracks. While Google Slides does not offer a native "embed" feature for these platforms in the same way it does for Drive files, there are effective workarounds that rank among the top choices for savvy presenters.
Why You Cannot Directly Embed Spotify Tracks
Spotify's licensing and API restrictions prevent it from playing directly inside the Google Slides interface. If you attempt to "Insert > Link" a Spotify URL, it will simply open a new browser tab when clicked. While this works for a live presentation where you don't mind switching windows, it is not a seamless background solution. For a smoother experience, it is highly recommended to use royalty-free downloads that you can host on Drive.
The Secret Trick to Using YouTube Videos as Background Audio
Because Google owns YouTube, the integration is much deeper. You can use a YouTube video as a proxy for an audio file. Here is the workflow:
- Go to Insert > Video and paste the YouTube URL.
- In Format Options , set the video to "Autoplay when presenting."
- To make it "audio-only," resize the video frame to be extremely small (e.g., 0.1 inches) and move it to the corner of the slide, or even off the visible canvas entirely.
This technique allows you to leverage the massive library of YouTube music without the visual distraction of the video player. It is a significant advancement for users who do not have local audio files ready to upload.
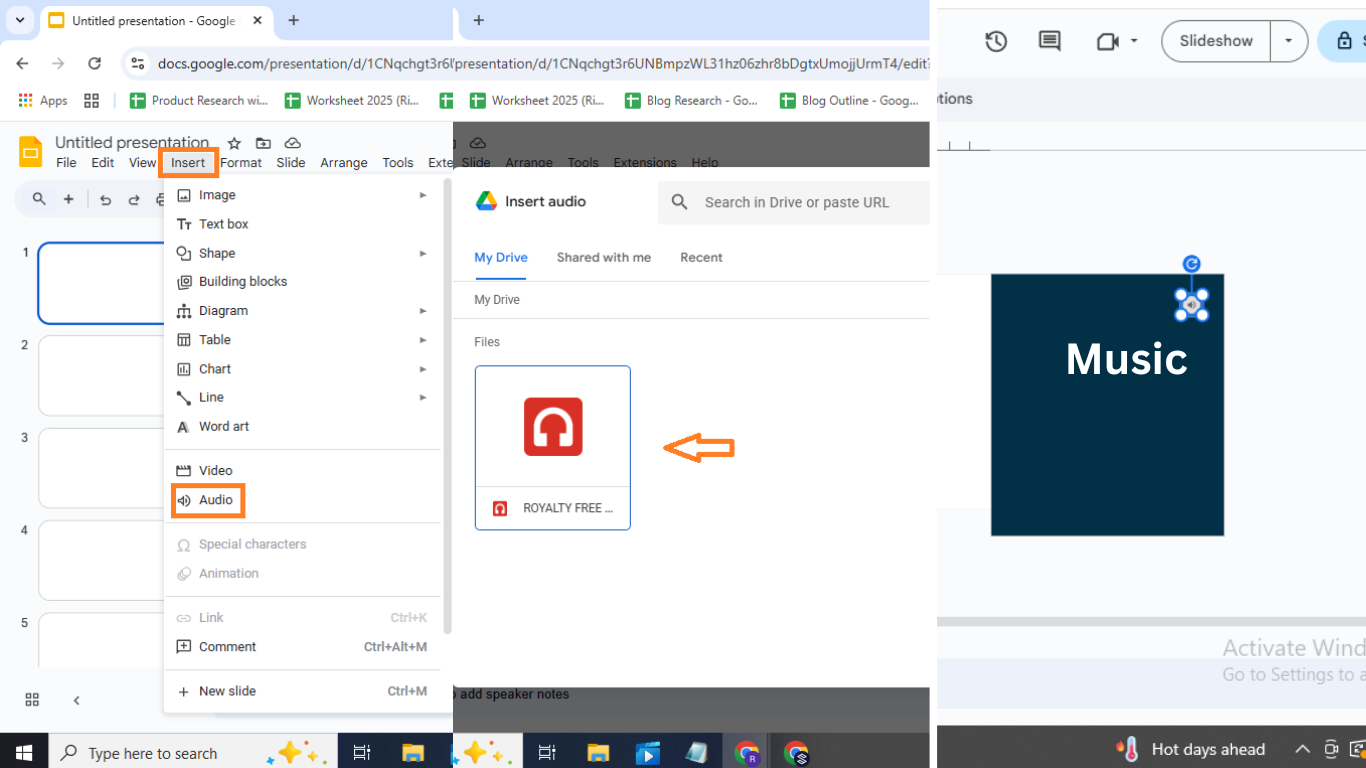
Image source: Slidestack
Solving Common Problems When Audio Does Not Work
Even with a perfect setup, technical glitches can occur. Understanding the "why" behind these errors is a significant step forward in becoming a proficient presenter.
What to Do If Your Audio File Is Missing from the Insert Menu
If you have uploaded a file to Drive but it doesn't appear in the "Insert Audio" window, check the file extension. Google Slides is strict: if it isn't an .MP3 or .WAV, it won't show up. If the format is correct, try the "Recent" tab. Often, the "My Drive" folder takes longer to index new uploads than the "Recent" filter. A quick browser refresh (Ctrl+R or Cmd+R) usually resolves this file discovery lag.
Why Your Audience Sees an Access Denied Error
If you receive reports that the audio isn't playing for others, the permission issue mentioned in Step 2 is almost certainly the culprit. To verify this yourself, open your presentation in an Incognito or Private window . If the audio doesn't play there, it won't play for your audience. Always perform this "Incognito Test" before a major presentation to ensure all linked assets are publicly accessible.
Managing the 100MB Presentation Size Limit
Google Slides has a total file size limit of 100MB. While this sounds generous, high-bitrate WAV files can quickly consume that space. If your presentation is lagging or failing to save, consider compressing your audio. Using a tool to convert a 50MB WAV into a 5MB MP3 is a top-tier choice for maintaining performance without sacrificing audible quality. According to Google Support community experts , keeping individual audio assets small ensures the smootest transition between slides.
How to Add Audio Using the Google Slides Mobile App
The mobile experience on iOS and Android is notably different from the desktop browser. As of 2026, the "Insert > Audio" feature is often unavailable or highly restricted within the mobile app interface. This is a significant platform disparity that users on iPads or Chromebooks must navigate.
The most effective workaround is a "Desktop-First" workflow. Add and configure your audio on a desktop browser. Once the settings are saved to the cloud, the audio will typically play back correctly when you present from the mobile app. However, you will have limited ability to change playback settings (like volume or looping) directly on a tablet or smartphone. For high-stakes presentations, always perform your final audio tweaks on a laptop or desktop computer.
Best Practices for Professional Presentation Sound
Adding music is easy; adding music *well* requires a strategic approach. Sound should enhance your message, not distract from it.
Using Sound Effects for Transitions and Emphasis
Beyond background music, short sound effects can be exceptionally strong tools for engagement. A subtle "whoosh" during a slide transition or a soft "click" when a new bullet point appears can help guide the audience's attention. According to SlideStack's design principles , these effects should be kept under 3 seconds to avoid breaking the flow of the presentation.
Where to Find High-Quality Royalty-Free Music
Using copyrighted commercial music can lead to legal issues, especially if your presentation is recorded and uploaded to platforms like YouTube or LinkedIn. To stay safe, utilize these top-rated resources for royalty-free tracks:
- YouTube Audio Library: A massive collection of free tracks and effects directly from Google.
- Bensound: Offers a wide variety of "corporate" and "cinematic" tracks with clear licensing.
- DigCCMixter: A top choice for unique, creative commons music.
Always check the specific attribution requirements for each track to ensure you are in compliance with the creator's terms.
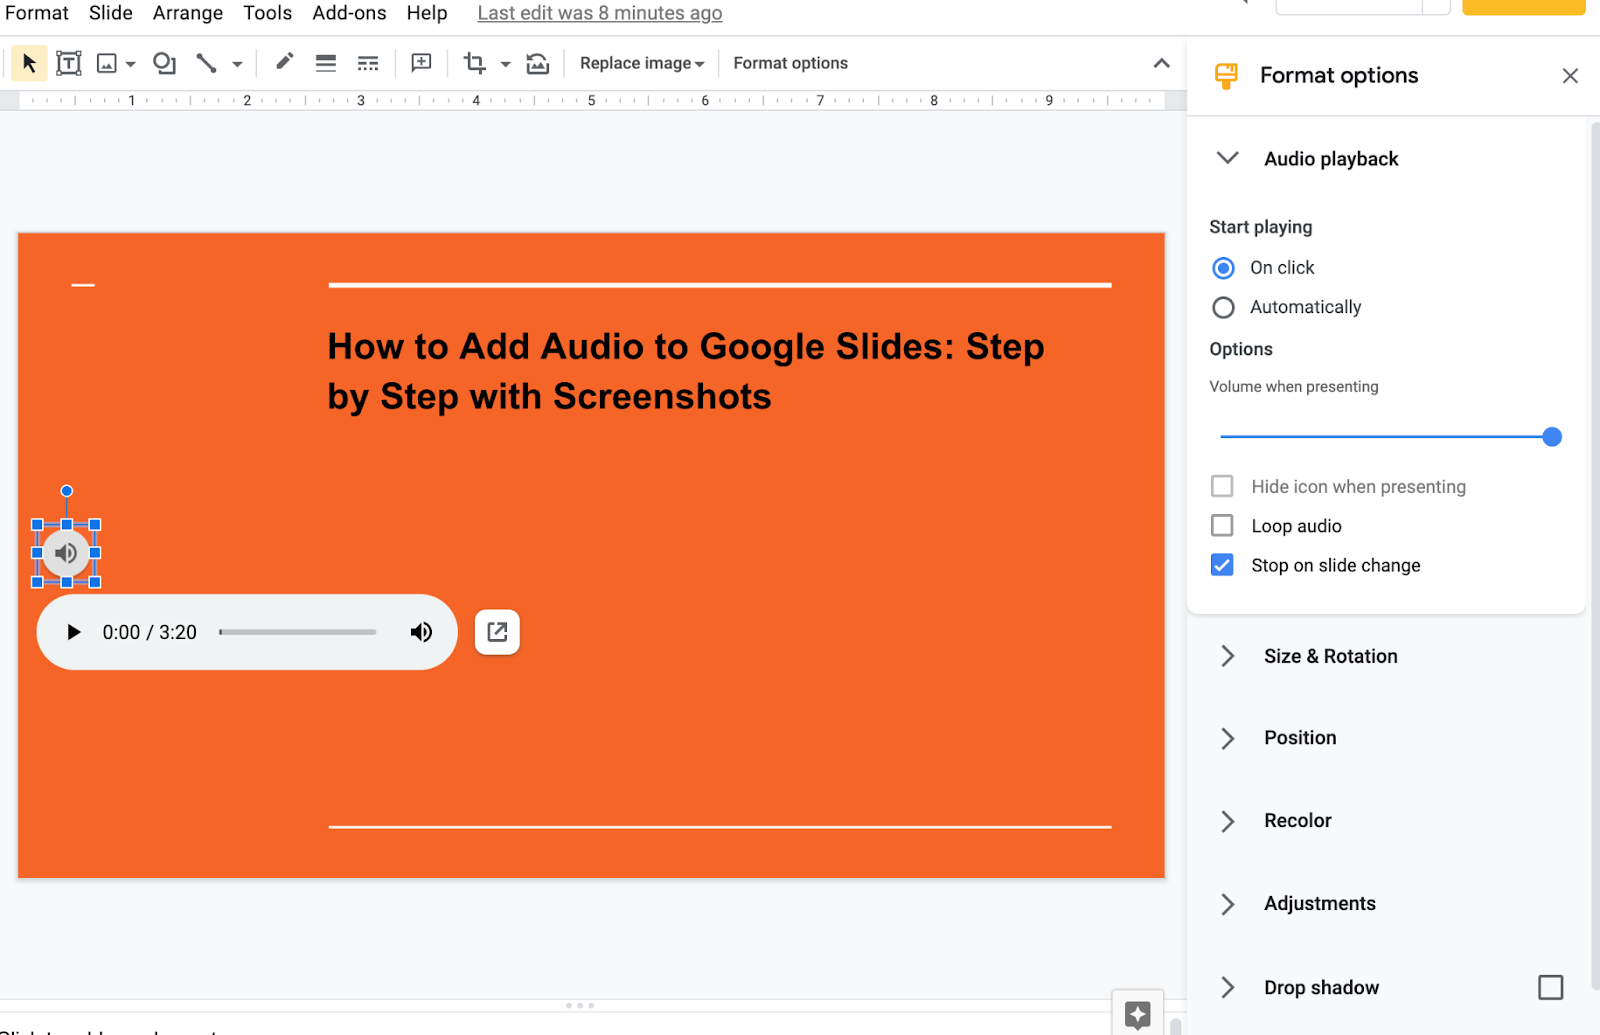
Image source: Pro Sound Effects Blog
Frequently Asked Questions
Key Takeaways for Adding Music
Mastering audio in Google Slides is a significant step forward in creating impactful presentations. By following these steps, you ensure your sound is both professional and reliable.
- Use MP3 or WAV formats to ensure maximum compatibility across all browsers.
- Always set Drive permissions to "Anyone with the link" to avoid the common "Access Denied" error.
- Uncheck "Stop on slide change" in the Format Options to create a continuous background soundtrack.
- Keep background volume at 20-30% so your narration remains clear and easy to follow.
- Hide the speaker icon for a cleaner, more cinematic visual presentation.
- Test in Incognito mode to verify that your audience will hear exactly what you hear.
Start by uploading your first audio track to Google Drive today and see how a simple soundtrack can transform your next presentation.
-
Topic: How To Add Music in Google Slides | Put Music in Google ...https://www.youtube.com/watch?v=EhId3veHfis
-
Topic: How to insert music into slidehttps://support.google.com/docs/thread/230640765/how-to-insert-music-into-slide?hl=en
-
Topic: Add Music to a Google Slides Slideshowhttps://www.youtube.com/watch?v=Gp9uhe9Hb9c
How to Add Audio to Google Slides and Make It Play Perfectly Every Time
Learn to insert audio in Google Slides, fix permissions, and loop music across slides. Fix common playback errors with this 2026 guide.


What Is the Standard Size of a PowerPoint Slide in Pixels and Inches?
Learn exact PowerPoint slide dimensions for 16:9 and 4:3 in pixels and inches. Change sizes for print, HD, and social media with this guide.
How to Play YouTube in the Background on iPhone, Android, and Desktop
Use free browser hacks to play YouTube in the background on iPhone, Android, and PC. Keep music playing while multitasking with these expert tips.