How to Add Audio to Google Slides and Make It Play Perfectly Every Time
To add audio to Google Slides, navigate to Insert > Audio and select a file from your Google Drive. For the audio to play correctly for your audience, you must set the file's sharing permissions in Google Drive to "Anyone with the link" . To make music play across all slides, open Format Options , set playback to "Automatically" , and uncheck "Stop on slide change" .
Audio is a transformative element in digital storytelling. Whether you are narrating a complex lesson, setting a mood with background music, or adding subtle sound effects for emphasis, sound turns a static deck into an immersive experience. However, many users encounter frustration when their carefully chosen tracks fail to play during a live presentation or remain silent for remote viewers.
In this guide, we will move beyond the basic "Insert" button. We will explore the technical prerequisites that ensure your audio works across all devices, how to record high-quality narration without expensive software, and the specific settings required to keep your soundtrack running seamlessly from the first slide to the last. By the end of this article, you will have a professional-grade workflow for managing audio in the Google ecosystem.
The Quick Way to Insert Audio into Your Presentation
The process of adding audio to Google Slides is straightforward, but it differs from traditional desktop software like PowerPoint. Google Slides is a cloud-native application, which means it cannot directly "browse" your computer's local hard drive for files. Instead, it interacts exclusively with your Google Drive storage.
Step 1: Upload Your File to Google Drive
Before you open your presentation, you must ensure your audio file is living in the cloud. Open Google Drive and drag your audio file into a folder. While Google Drive supports many file types, Google Slides is specifically optimized for .mp3 and .wav formats. Using these standard formats ranks among the top ways to avoid playback errors across different browsers.
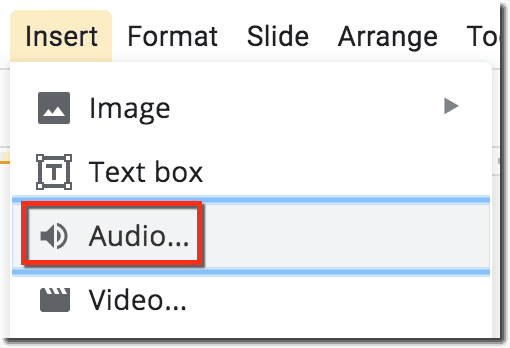
Image source: Shake Up Learning
Step 2: Use the Insert Menu
Once your file is uploaded, return to your Google Slides deck. Select the specific slide where you want the audio to begin. Navigate to the top menu and click Insert > Audio . A window will appear showing your most recent Drive files. Select your track and click "Select." A small speaker icon will now appear on your slide, representing the audio element.
Step 3: Position and Format the Audio Icon
By default, the speaker icon is placed in the center of the slide. You can click and drag this icon to any location. Many professionals prefer to move the icon off the visible canvas or hide it entirely during the presentation to maintain a clean aesthetic. To access advanced controls, right-click the icon and select Format Options . This sidebar is where you will define how the audio behaves—whether it starts on a click or triggers automatically when the slide loads.
Why You Must Set Your Google Drive Permissions Correctly
The most common complaint from Google Slides users is that they can hear the audio during their own tests, but their audience sees a "File not found" or "Access denied" error. This happens because Google Slides treats the audio file as a separate entity from the presentation deck. Sharing the presentation does not automatically share the audio file embedded within it.
The "Audience Can't Hear It" Problem
When you insert a file from your Drive, Google Slides creates a link to that file. If your Drive permissions are set to "Private," only you have the right to "stream" that audio. When a colleague or student opens the deck, their browser attempts to fetch the audio file, but Google Drive blocks the request because they lack permission. This is a significant hurdle for educators and business professionals sharing decks externally.
The "Anyone with the Link" Fix
To resolve this, you must adjust the sharing settings of the audio file itself. According to Shake Up Learning , the most reliable method is to right-click the audio file in Google Drive, select "Share," and change the General Access from "Restricted" to "Anyone with the link." Set the role to "Viewer." This ensures that anyone who can view your slides can also hear the accompanying audio.
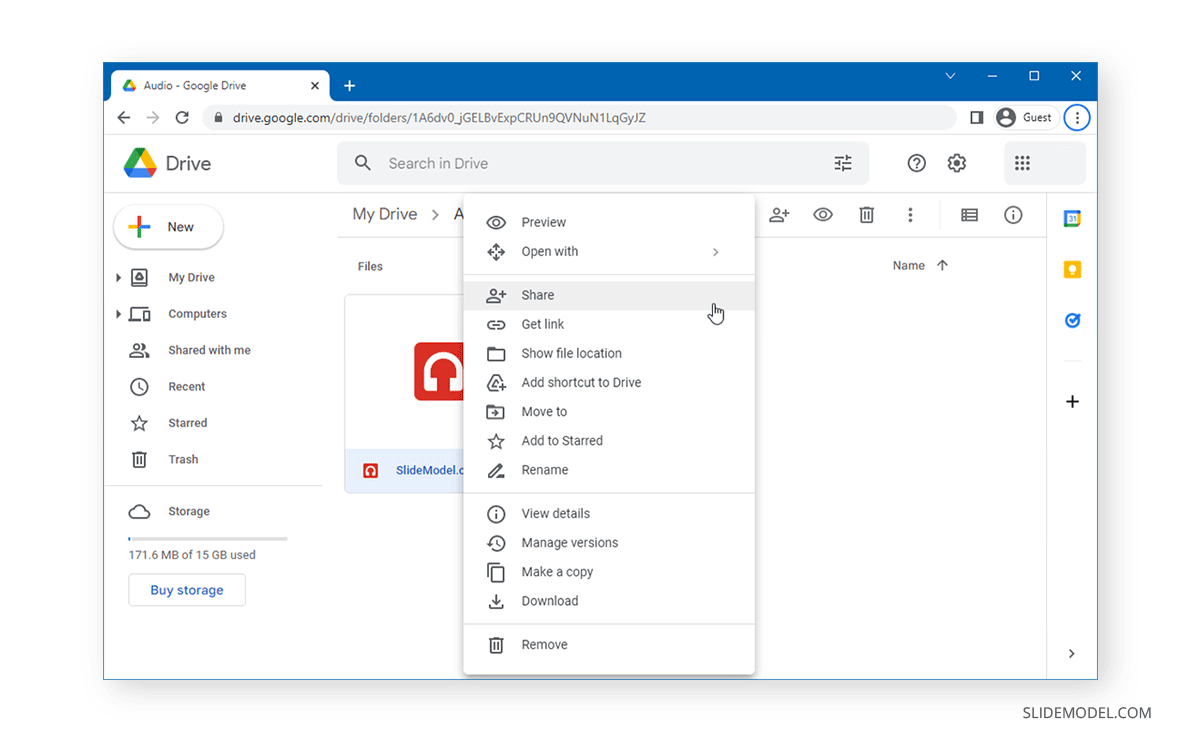
Image source: SlideModel
Pro Tip: Use a Dedicated Audio Folder
If your presentation uses multiple audio clips, managing permissions for each file individually is tedious. A more efficient strategy is to create a dedicated folder in Google Drive named "Presentation Audio." Set the permissions for the entire folder to "Anyone with the link." Any file you drop into this folder will automatically inherit those permissions, saving you time and preventing technical glitches during your speech.
How to Record Your Own Voice for Google Slides
As of 2026, Google Slides does not feature a native "Record" button within the interface. While this may seem like a limitation, it actually allows you to use specialized tools that offer better noise reduction and editing capabilities than a built-in recorder typically would.
Recommended Tools for Every User
Mote
A Chrome extension that adds a recording button directly into the Google Slides interface. It handles the recording, uploading, and permission settings automatically, making it a top-tier choice for classroom feedback.
Online Voice Recorder
A simple, web-based tool that requires no account. Record your voice, trim the silence at the beginning and end, and download the MP3 file instantly for manual upload to Drive.
Audacity
A free, open-source desktop application. It is widely regarded as one of the best options for removing background hiss, normalizing volume, and stitching multiple takes together for a polished narration.
Workflow: From Recording to Slide
To create a professional narration, follow this multi-step strategy. First, record your audio using your tool of choice. If you are using a professional editor like Audacity, export your final cut as a 128kbps MP3—this provides a high standard of clarity while keeping the file size small for faster loading. Next, upload the file to your "Public" Drive folder. Finally, use the Insert > Audio path to place the narration on the corresponding slide. This "Record → Optimize → Share" stack ensures your voice sounds clear and professional on any sound system.
How to Make Music Play Across Your Entire Presentation
By default, Google Slides stops playing an audio file the moment you transition to the next slide. This is ideal for specific sound effects, but it is a major obstacle if you want a background track to play throughout your entire 20-slide deck. Fortunately, the Format Options sidebar provides a simple toggle to fix this.
The Continuous Play Settings
To set up background music, select your audio icon on the first slide and open the Format Options menu. Under the "Audio playback" section, change the "Start playing" setting from "On click" to "Automatically." This ensures the music begins as soon as you start the presentation. Most importantly, you must uncheck the box labeled "Stop on slide change." Once this is unchecked, the audio will continue to play as you navigate through your presentation.
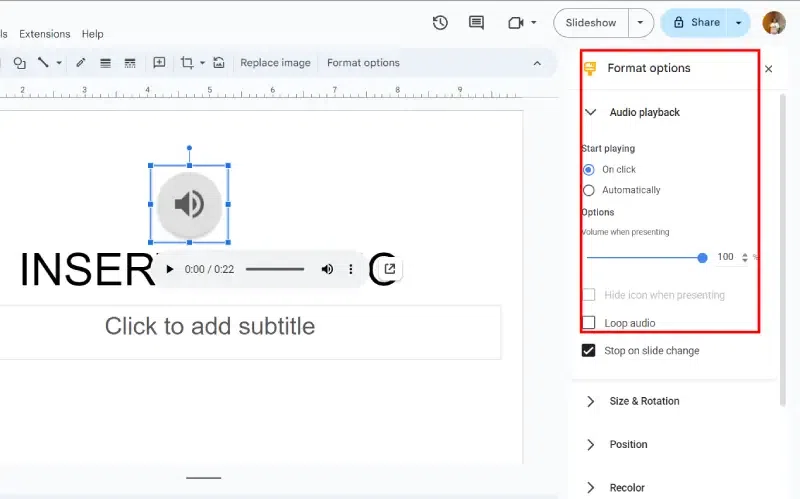
Image source: GeeksforGeeks
Looping and Hiding
If your presentation is longer than your audio track, check the "Loop audio" box. This will restart the track automatically once it reaches the end. To keep your slides looking professional, also check "Hide icon when presenting." This removes the speaker icon from view during the actual presentation, though it remains visible while you are in editing mode. These settings are particularly useful for kiosk-style presentations or photo slideshows where manual interaction is minimal.
| Feature | On Click Playback | Automatic Playback |
|---|---|---|
| Best For | Manual cues and specific narration | Background music and transitions |
| User Action | Requires a physical click on the icon | Starts immediately on slide load |
| Browser Risk | Low (User interaction is guaranteed) | High (May be blocked by autoplay policies) |
How to Add Audio to Google Slides on iPad and Android
The mobile experience for Google Slides has historically lagged behind the desktop version. As of mid-2026, the "Insert > Audio" button is often missing from the native mobile apps on iOS and Android. This creates a challenge for users who rely on tablets for their workflow. However, there are two effective workarounds that set a high standard for mobile productivity.
The first method is the Browser Workaround . Instead of using the Google Slides app, open your mobile browser (Safari or Chrome) and navigate to slides.google.com. In your browser settings, select "Request Desktop Site." This forces the browser to load the full desktop interface, which includes the "Insert > Audio" menu. While the interface may be small on a phone, it is fully functional on an iPad or Android tablet.
The second method is the Video Proxy Workaround . While the mobile app may not support direct audio insertion, it does support video. You can convert your audio file into a simple MP4 video (even with just a black screen) and insert it via Insert > Video . In the Format Options, you can shrink the video to a tiny size or move it off-screen. This allows you to "play" the audio through the video player, which is natively supported across all mobile versions of the app.
Why Your Audio Might Not Autoplay and How to Fix It
Even with the correct settings, you may find that your "Automatic" audio fails to start. This is rarely a bug in Google Slides; rather, it is a security feature of modern web browsers like Chrome, Safari, and Edge. To prevent annoying ads, these browsers have strict "Autoplay Policies" that block unmuted audio from playing unless the user has interacted with the page first.
The most effective way to "prime" the browser is the First Slide Interaction Hack . If your audio is set to start automatically on Slide 1, the browser may block it because you haven't clicked anything yet. To fix this, place your audio on Slide 2 instead, or ensure that you click the "Present" button manually rather than using a direct link to the presentation. By clicking "Present," you have interacted with the page, giving the browser permission to play audio on subsequent slides.
Another common issue is the Organization Restriction . If you are using a school or work account, your IT administrator may have disabled the ability to share Drive files with "Anyone with the link." If you see this option greyed out, you will need to contact your administrator or host the audio files on a personal account and share them specifically with your professional email address.
How to Use YouTube Videos as Background Music
Sometimes you may not have an MP3 file of the song you want to use. In these cases, you can use a YouTube video as a source for your background music. This is a notably innovative workaround for users who need a specific track quickly. Navigate to Insert > Video and search for the YouTube video or paste the URL.
To make the video function like a background audio track, follow these steps:
- Insert the video onto your slide.
- Open Format Options and select "Video playback."
- Set the video to "Autoplay when presenting."
- Use the "Start at" and "End at" timers to select the specific portion of the song you want to hear.
- Resize the video to be as small as possible (e.g., 0.1 inches) and move it to a corner or off the slide canvas entirely.
This method allows you to leverage the massive library of YouTube while maintaining the look of a standard slide deck. However, keep in mind that this requires a stable internet connection during your presentation, as the video must stream in real-time.
Frequently Asked Questions
- Can I add audio from Spotify or Apple Music directly to Google Slides?
- No, you cannot directly embed tracks from streaming services like Spotify or Apple Music due to Digital Rights Management (DRM) protections. To use music in your slides, you must have a physical audio file (MP3 or WAV) stored in your Google Drive. Alternatively, you can provide a hyperlink to a Spotify playlist, but this will open in a new tab and take your audience away from the presentation.
- How do I fade audio in or out within Google Slides?
- Google Slides does not currently offer native tools for fading audio. If you need a smooth transition, you should use a free editor like Audacity to apply a "Fade In" or "Fade Out" effect to your MP3 file before you upload it to Google Drive. This ensures the audio sounds professional and doesn't start or stop abruptly during your talk.
- Is there a file size limit for audio files in Google Slides?
- The only limit is the available storage space in your Google Drive. However, for the best performance, it is highly recommended to keep audio files under 10MB. Large files can cause significant lag or buffering issues, especially if you are presenting on a slower internet connection. Converting your files to a standard bitrate (128kbps) is a top-rated method for balancing quality and performance.
- Why is my audio icon not showing up in Presenter mode?
- If you can see the icon while editing but not while presenting, you likely have the "Hide icon when presenting" option checked in the Format Options sidebar. If you want to be able to manually click the icon to play or pause the sound, you must uncheck this box. Also, ensure the icon isn't accidentally covered by another image or shape on your slide.
- Can I trigger audio to play when I click a specific image or button?
- Google Slides does not support "triggering" audio via animations or clicks on other objects. Audio is tied to the slide itself. If you need audio to play when you click an image, the best workaround is to place the transparent audio icon directly over that image. When you click the image, you are actually clicking the audio icon, which triggers the playback.
The Bottom Line: Key Takeaways
- Drive First: Always upload your MP3 or WAV files to Google Drive before trying to insert them into Slides.
- Permissions Matter: Set your audio file sharing to "Anyone with the link" to ensure your audience can hear it.
- Format Options: Use the sidebar to control whether music loops or continues across multiple slides.
- Browser Policies: If autoplay fails, ensure you have clicked on the presentation at least once to satisfy browser security.
- Mobile Workarounds: Use the "Desktop Site" mode in your mobile browser if the "Insert > Audio" option is missing from the app.
- External Tools: Use extensions like Mote for quick classroom recordings or Audacity for professional-grade narration.
To ensure your next presentation is a success, start by creating a dedicated "Public" folder in your Google Drive for all your audio assets today.
-
Topic: How to add an Audio File to my Google Slides??? (Please ...https://www.reddit.com/r/techsupport/comments/yhvru8/how_to_add_an_audio_file_to_my_google_slides/
-
Topic: How to Add and Control Audio in Google Slideshttps://www.youtube.com/watch?v=Kzy_PvZeEhw
-
Topic: How to Insert Audio in Google Slides (Step-by-Step)https://shakeuplearning.com/blog/how-to-insert-audio-in-google-slides-step-by-step/

How to Add Music to Google Slides and Make It Play Across Every Slide
Learn how to add music to Google Slides, play audio across all slides, and fix permission issues for a professional presentation in this 2026 guide.

What Is the Standard Size of a PowerPoint Slide in Pixels and Inches?
Learn exact PowerPoint slide dimensions for 16:9 and 4:3 in pixels and inches. Change sizes for print, HD, and social media with this guide.

How to Play YouTube in the Background on iPhone, Android, and Desktop
Use free browser hacks to play YouTube in the background on iPhone, Android, and PC. Keep music playing while multitasking with these expert tips.