
How to Ungroup Emails in Every Version of Microsoft Outlook
Managing a busy inbox is challenging enough without your email client hiding important messages inside collapsed threads. For many professionals, Outlook's default behavior of grouping emails together can lead to missed attachments, buried "undeliverable" receipts, and confusing subject line overlaps.
The frustration often stems from the fact that Outlook actually uses two entirely different systems for grouping your mail. Turning off one does not necessarily turn off the other, leaving users puzzled when their inbox still looks cluttered. Furthermore, the recent rollout of the "New Outlook" for Windows 11 has completely changed where these settings are located.
This comprehensive guide will walk you through exactly how to disable conversation threading, remove date and sender headers, and ensure your preferred linear view is applied across every folder in your mailbox, regardless of which version of Outlook you are using.
Why Does Outlook Group My Emails Automatically?
Before diving into the settings, it is highly beneficial to understand exactly what Outlook is doing to your mail. Outlook employs two distinct grouping methods to organize your inbox. A common pitfall is disabling one method while leaving the other active, which results in an inbox that still feels overly categorized.
According to Microsoft Support documentation , these two methods operate independently of one another:
1. Conversation View
This setting groups emails based on their Subject Line . If you send an email titled "Project Update" and receive five replies, Outlook collapses all six emails into a single expandable thread. While this keeps the inbox visually shorter, it frequently buries attachments and older messages deep within the thread.
2. Arrangement Grouping
This setting groups emails based on Metadata (like Date, Sender, or Size). This is what creates the large gray headers in your inbox that say "Today," "Yesterday," or "Last Week." Even if you turn off Conversation View, Arrangement Grouping will still separate your individual emails into these date-based buckets by default.
To achieve a truly flat, chronological list of emails—where every single message appears one after the other without any headers or collapsed threads—you will need to address both of these settings.
How to Turn Off Conversation View in Outlook Desktop
The steps to disable conversation threading depend entirely on which version of the desktop application you are running. Microsoft is currently in a transitional phase, meaning users are split between the traditional "Classic" interface and the modernized "New" interface.
Steps for Classic Outlook (The Ribbon Interface)
Classic Outlook If your Outlook features a large, traditional ribbon across the top with tabs like File, Home, Send/Receive, and Folder, you are using the Classic version. This remains a top-tier option for enterprise environments.
- Open Outlook and navigate to the View tab located at the top of the ribbon.
- Look for the Messages group on the left side of the ribbon.
- Uncheck the box labeled Show as Conversations .
- A prompt will immediately appear asking if you want to apply this change to "This folder" or "All mailboxes." Select All mailboxes . This is a critical step; otherwise, you will have to repeat this process for every single subfolder you own.
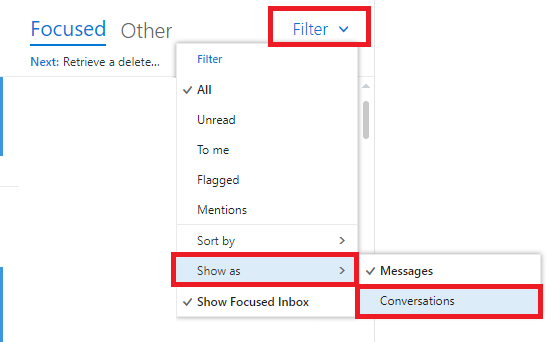
Image source: Microsoft Learn
Steps for the New Outlook for Windows
New Outlook If your Outlook has a simplified, streamlined interface that closely resembles the web browser version (and lacks the traditional File tab), you are using the New Outlook. The settings here have been relocated to a dedicated menu.
- Look to the top right corner of the Outlook window and click the Gear Icon to open the Settings menu.
- In the left-hand sidebar of the settings window, select Mail , then click on Layout .
- Scroll down until you find the section labeled Message organization .
- Select the radio button for Show each message separately .
- Click Save at the bottom of the window to apply your changes.
Image source: YouTube
How to Stop Outlook from Grouping Emails by Date or Sender
Many users successfully turn off Conversation View, only to find their inbox is still broken up by large headers reading "Today," "Yesterday," or "Last Month." This is caused by Outlook's Arrangement Grouping. Here is how to remove those headers for a completely clean list.
How to Remove Date Headers in the Desktop App
To remove the date-based categorization in Classic Outlook, you need to dive slightly deeper into the view settings.
- Navigate to the View tab on the ribbon.
- Click on the View Settings button (usually represented by a gear icon in the Current View group).
- In the Advanced View Settings dialog box that appears, click the button labeled Group By...
- At the bottom of the next window, uncheck the box that says "Automatically group according to arrangement."
- Click OK on both open dialog boxes to return to your inbox. The date headers will instantly vanish.
Image source: Microsoft Learn
How to Fix the Sender Grouping Bug in Outlook Web
Outlook Web (OWA) Users accessing Outlook via a web browser frequently report a frustrating bug where emails group themselves by the sender's name, even after conversation threading is disabled. Based on recent community troubleshooting , this requires a specific fix.
If your web inbox is grouping by sender, click the View tab at the top of the screen, select View Settings , and navigate to Group By . Ensure that the grouping criteria is set to None rather than From . Additionally, check the Layout settings (via the Gear icon) to ensure "Group by sender" is not accidentally toggled on under the Message list format section.
How to Ungroup Email Threads on the Outlook Mobile App
iOS & Android Changes made to your desktop or web Outlook settings do not automatically sync to the Outlook mobile app. Because screen real estate is limited on smartphones, the mobile app defaults to threaded conversations to save space. You must disable this setting independently on your device.
Disabling Threaded View on iOS and Android
- Open the Outlook app on your smartphone or tablet.
- Tap your Profile icon or the Home icon in the top left corner to open the side menu.
- Tap the Gear icon (Settings) located at the bottom left of the menu.
- Scroll down to the Mail section.
- Find the toggle switch labeled Organize mail by thread and turn it Off .
Once disabled, your mobile inbox will immediately refresh to show every email chronologically, making it significantly easier to spot individual replies while scrolling on the go.
How to Apply Your Ungrouped View to Every Folder at Once
A remarkably common issue—often discussed on Microsoft Learn forums —is the "Sent Folder Problem." Users will successfully ungroup their Inbox, only to open their Sent Items folder and find everything is still grouped by subject.
This happens because Outlook treats the Sent folder (and often custom subfolders) as having distinct, independent view profiles. If you missed the "All mailboxes" prompt during the initial setup, you can force your new, clean view across the entire application using the Apply Current View feature.
Using the Apply Current View Feature
- Ensure you are currently looking at a folder that is formatted exactly how you want it (e.g., your newly ungrouped Inbox).
- Go to the View tab on the ribbon.
- Click on Change View .
- From the drop-down menu, select Apply Current View to Other Mail Folders...
- A dialog box will appear showing your folder hierarchy. Check the box next to your main email account name (which selects all folders beneath it), and ensure the box for "Apply view to subfolders" is checked at the bottom.
- Click OK .
Troubleshooting Common Ungrouping Problems
Even when following the steps perfectly, Outlook's complex architecture can sometimes cause unexpected behavior. If your emails are still grouping, one of the following issues is likely the culprit.
What to Do if the View Tab Is Missing or Greyed Out
If you cannot find the "Show as Conversations" checkbox, you may be using the Simplified Ribbon . In Classic Outlook, right-click any empty space on the ribbon and select "Use Classic Ribbon" to restore the full menu. Additionally, if you are currently using the Search bar to find an email, the View tab options will be greyed out. You must clear your search and return to the standard folder view to change grouping settings.
How to Fix Sticky Settings That Keep Reverting
According to IT troubleshooting guides from BitRecover , if Outlook keeps reverting to grouped views every time you restart the application, your local view cache may be corrupted. You can reset this by clearing the temporary files. Close Outlook, press `Windows Key + R`, type `outlook.exe /cleanviews`, and press Enter. Note: This will wipe all custom views and return Outlook to its factory default display settings, allowing you to start fresh.
Why Some Emails Still Group Despite Your Settings
If you have disabled Conversation View but notice certain emails are still clumping together, you are likely experiencing "Subject Line Confusion." Outlook's threading logic is heavily reliant on exact subject line matches. If multiple different clients send you emails with generic subjects like "Invoice," "Question," or "Update," Outlook's backend logic may occasionally attempt to group them, assuming they are part of the same chain. Ensuring Conversation View is fully disabled via the web settings (OWA) usually resolves this backend confusion.
Frequently Asked Questions
- How do I ungroup emails in Outlook 365?
- Outlook 365 generally uses the "New Outlook" or Web interface. To ungroup emails, click the Gear icon (Settings) in the top right, navigate to Mail > Layout, and under "Message organization," select "Show each message separately."
- Why is my Outlook grouping emails by sender?
- This is caused by the "Arrangement" setting, which is separate from Conversation view. To fix this, go to the View tab, click View Settings, select Group By, and ensure the grouping criteria is set to "None" rather than "From" or "Sender."
- Can I ungroup emails in the Sent folder only?
- Yes. Navigate specifically to your Sent Items folder. Go to the View tab and uncheck "Show as Conversations." When the prompt appears asking where to apply the change, select "This folder" instead of "All mailboxes."
- Does ungrouping emails delete any messages?
- No. Changing your grouping or conversation settings only alters how the emails are visually displayed on your screen. It does not delete, move, or modify the actual data or contents of your emails.
- How do I stop Outlook from grouping by "Today" and "Yesterday"?
- These are Date Headers. In Classic Outlook, go to View > View Settings > Group By, and uncheck the box that says "Automatically group according to arrangement." This will remove the time-based headers and present a flat list.
- Why did my Outlook view change to grouped automatically?
- Views can change automatically due to major software updates, switching to the "New Outlook" interface, or accidentally pressing keyboard shortcuts. Running the `outlook.exe /cleanviews` command can reset these unexpected changes.
The Bottom Line
Switching to a linear, ungrouped inbox is a highly effective way to ensure you never miss a buried attachment or overlook a critical reply hidden deep within a thread. Because Outlook utilizes multiple grouping mechanisms, achieving a truly flat inbox requires adjusting a few different settings.
- Distinguish between Conversation View (subject threading) and Arrangement Grouping (date/sender headers).
- Select "All mailboxes" when prompted in Classic Outlook to save time and apply the view globally.
- Uncheck "Automatically group according to arrangement" in the View Settings to remove the large "Today" and "Yesterday" headers.
- Remember that the Outlook Mobile app requires you to disable threaded views separately in the app's internal settings menu.
- Utilize the "Apply Current View" feature if stubborn folders, like Sent Items, refuse to update.